As users in your organization work on their projects, they generate more and more data you probably want to protect. Microsoft provides a few tools to prevent data loss. One of these is Microsoft 365 backup policies. In this article, we will take a closer look at Microsoft 365 backup policies explaining how to set them up or how they can be used to reduce the probability of Microsoft 365 data loss. Let’s start!
What is Microsoft 365 backup policy?
Long story short: Microsoft 365 backup and recovery policy define where Microsoft’s responsibilities regarding data protection and backup ends, and where yours begins.
Microsoft is responsible for:
- Hardware failure
- Server-side software failure
- Data center power outage
- Natural disasters
As you can see, this list is pretty short and it refers mainly to infrastructure-related threats. Looking at this from another angle, we can rephrase this list and we can see that Microsoft is responsible for protecting a network, hardware, virtualization, OS, and application.
Regarding these policies, you as a customer, are responsible for:
- Human error
- User-side software errors
- Malware attacks
- Hacker attacks
- Malicious insiders
in short: users, business data, and App Admin should be your concerns and remain under your control, protection, and responsibility.
Microsoft ensures that they meet their policies by replicating your data across at least two, geographically independent data centers. This solution provides availability and recoverability of data in case of any event of failure on the Microsoft side. However, it does not protect deleted emails or mailbox accounts.
Retention – a crucial part of Office 365 backup policies
Microsoft backup policies as a feature in Microsoft 365 allow IT administrators to set up and configure policies that affect how data is protected. The main part of Office 365 backup policies is the retention policy. Retention policy determines how long data is retained and how long after deletion it’s possible to recover. Default retention policy settings vary between Office 365 applications.
Exchange Online has a default 30-day retention period for deleted user’s mailboxes. Deleted individual items can be recovered for up to 14 days, but this period can be manually increased to 30 days maximally.
In OneDrive by default, deleted files and deleted accounts are retained for 30 days. However, this period can be changed in OneDrive storage settings by administrators.
In SharePoint Online by default, data is backed up every 12 hours and retained for 2 weeks – exactly 14 days. Deleted items land and are kept in the recycle bin for 93 days – after that time they are permanently deleted and we name it hard deletion.
Apart from Exchange, OneDrive, and SharePoint, you can apply retention policies to many of Microsoft 365 applications, including Microsoft 365 groups, Skype for business, Exchange public folders, Teams chats, or Teams channel messages.
Setting up a retention policy you can set the time period for how long you want to retain deleted or changed users’ files. At this time you are able to recover those files. After this set period ends, your files are deleted permanently. That is why you should not think of Microsoft 365 backup policies as an alternative for a Microsoft 365 data backup – you should definitely have an additional layer of your Microsoft 365 data protection.
Deleted Items Folder Retention Policy
Microsoft 365 offers various retention policies for deleted items folders. By default, Microsoft retains deleted items for 30 days. However, administrators have the flexibility to modify this policy based on specific account requirements. To make changes, administrators can follow the steps below to modify the Default MRM (Messaging Records Management) policy in the Microsoft 365 Admin Center.
- Open Office 365 Admin.
- Go to the Exchange admin center.
- From the menu bar, choose Compliance Management.
- Select Edit retention policies.
- In addition to changing the Default MRM policy, a company administrator can configure it to protect items for 7 days, 30 days, one year, or another period according to the company’s requirements.
In addition, Microsoft 365 offers a convenient recovery feature that enables users to restore deleted items. When an item is deleted, it is initially moved to the Deleted Items folder. In the event that it is further deleted from the Deleted Items folder, it is then transferred to the Recoverable Items folder. The process of recovering items from either the Deleted Items or Recoverable Items folder serves as a standard and reliable method for data recovery.
Microsoft 365 Backup Policy
Setting up Retention Tags
Your first step to creating Microsoft 365 Retention policy is to set up retention tags. Retention tags are applied to folders or even individual items like emails. Those tags influence how long items are retained, and what to do with them after the set period ends.
Microsoft provides users with some predefined retention tags, but you might need to create one depending on your organization’s needs.
Now I’m going to show you how to set up retention tags using Exchange Online as an example.
The first thing you need to do is log into the Exchange admin center of your organization. Open the Microsoft 365 admin center and open all admin centers. If you can’t find it under this link:
https://admin.microsoft.com/AdminPortal/Home#/alladmincenters
Then select Exchange
Using the navigation pane (on the left side of the screen) choose Compliance Management, from the tabs on top of the screen choose Retention Tags, and then select Add (Plus sign)

You can choose from one of the 3 options available:
- Applied automatically to the entire mailbox (default)
- Applied automatically to a specific folder
- Applied by users to items and folders (Personal) – this tag will allow users to create personal tags, allowing setting archive or deletion settings to folders or emails, different from settings applied by an administrator to the parent folder or entire mailbox.
In this case, we will choose Applied by users to items and folders (personal), New window will open, where you will need to set up the Name for the tag, I will name this tag: “Retention Tag 01”.
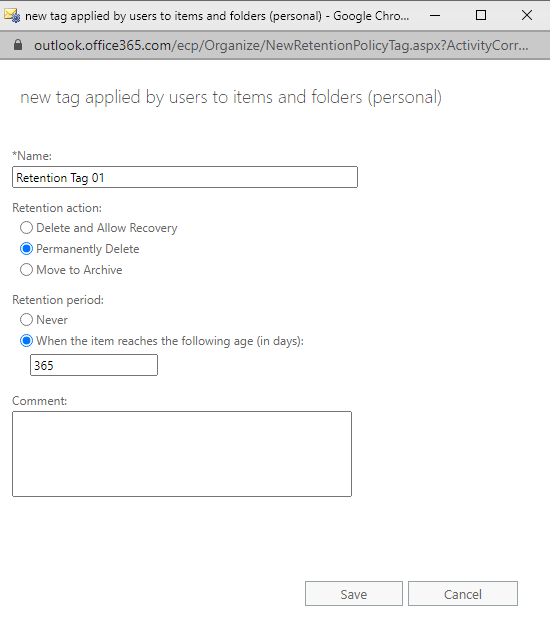
You will also need to set Retention Action specifying what will happen to an item after the retention period ends. I will choose “Permanently Delete”.
The last thing you need to do is set the Retention Period, you can choose to never archive items, or adjust the number of days for how long items should be retained before being moved or deleted. I will set a 365-day retention period.
You can also leave a comment, which won’t be displayed to users.
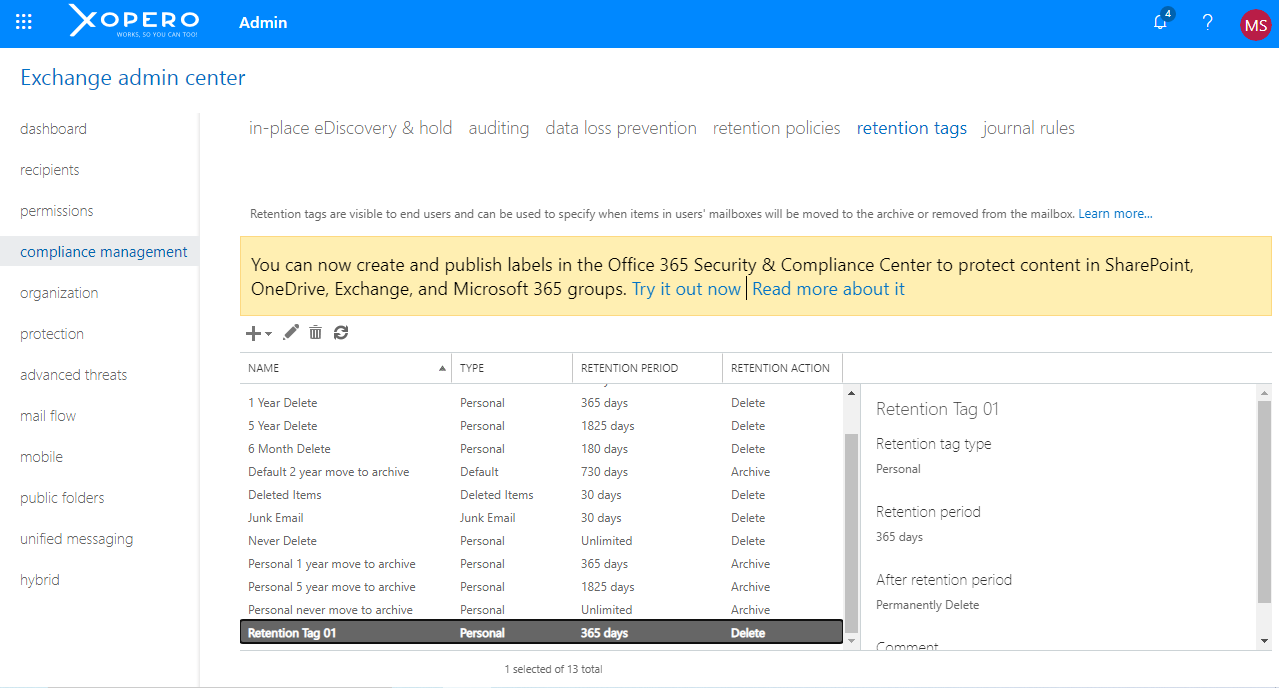
After you click the Save button, you will return to the Retention Tags tab, where the tag we created will be displayed.
Setting up Microsoft 365 retention policies
Now we are going to create a new Retention Policy using the tag we just created.
Go to the Compliance Manager and now choose the Retention Policies tab.
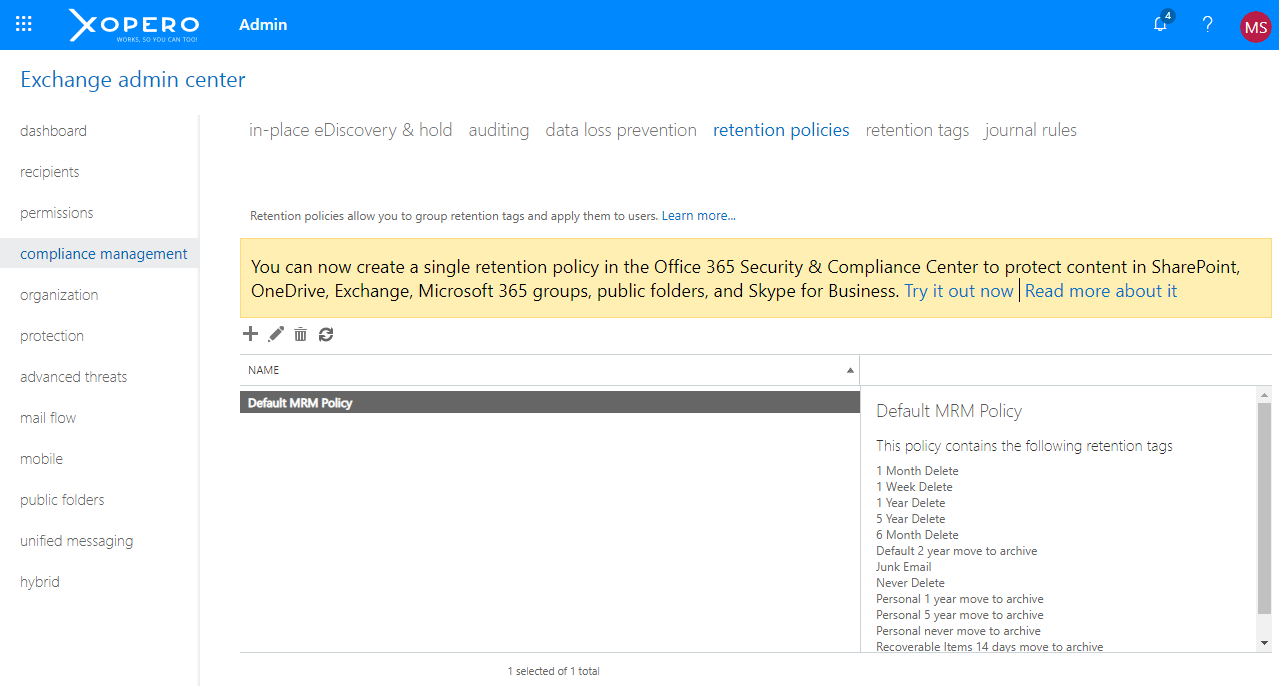
Here you can add new Retention Policies or manage existing ones. By default, there is a “Default MRM Policy” which applies to user accounts. When a new user is added to your organization, MRM Policy is added automatically to that account.
Let’s add a new Retention Policy. Click the “plus” icon to create one.
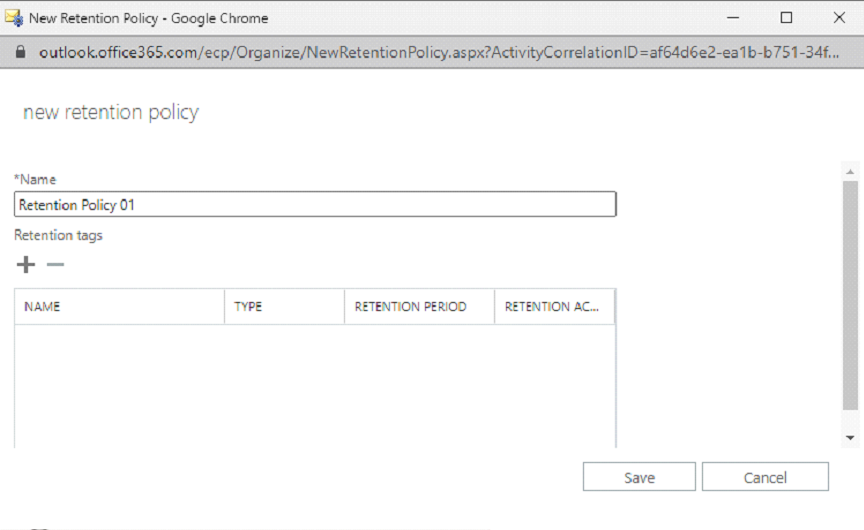
A new tab in your browser will open. Enter the Name of your policy, for example, “Retention Policy 01”. Click “+” to add retention tags to your policy.
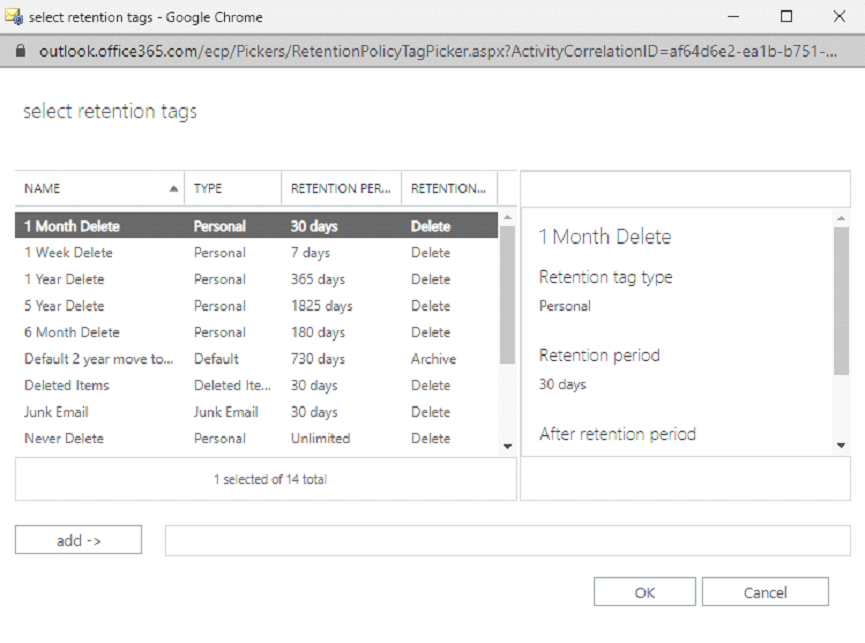
A new window will open, with a list of defined retention tags, clicking on any will show a detailed description of one. Here you will also see the tag we created earlier.
Let’s add it, and also add tags named “Junk mail” and “Never Delete”. You can add tags, by clicking the “add ->” button. After you choose your desired tags, click “OK”.
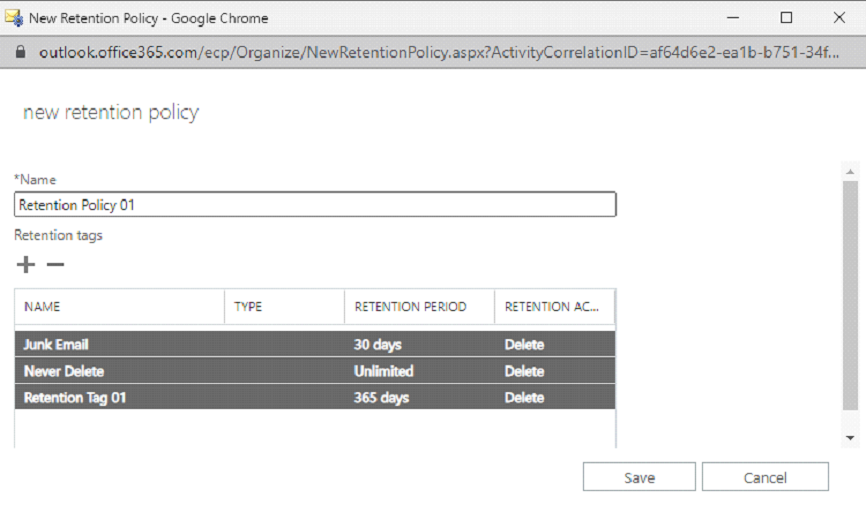
Now tags we added will be displayed in a list. If you include all the needed tags, click save.
Are Microsoft 365 backup policies enough?
Now you know how to add, edit, and manage Microsoft default Retention Policy, and Retention Tags. Setting up Microsoft backup and recovery policies provides administrators and users with the capability to restore deleted items in Microsoft Office applications for a specified period of time. You can set them up to fit your organization’s needs and help you recover deleted data.
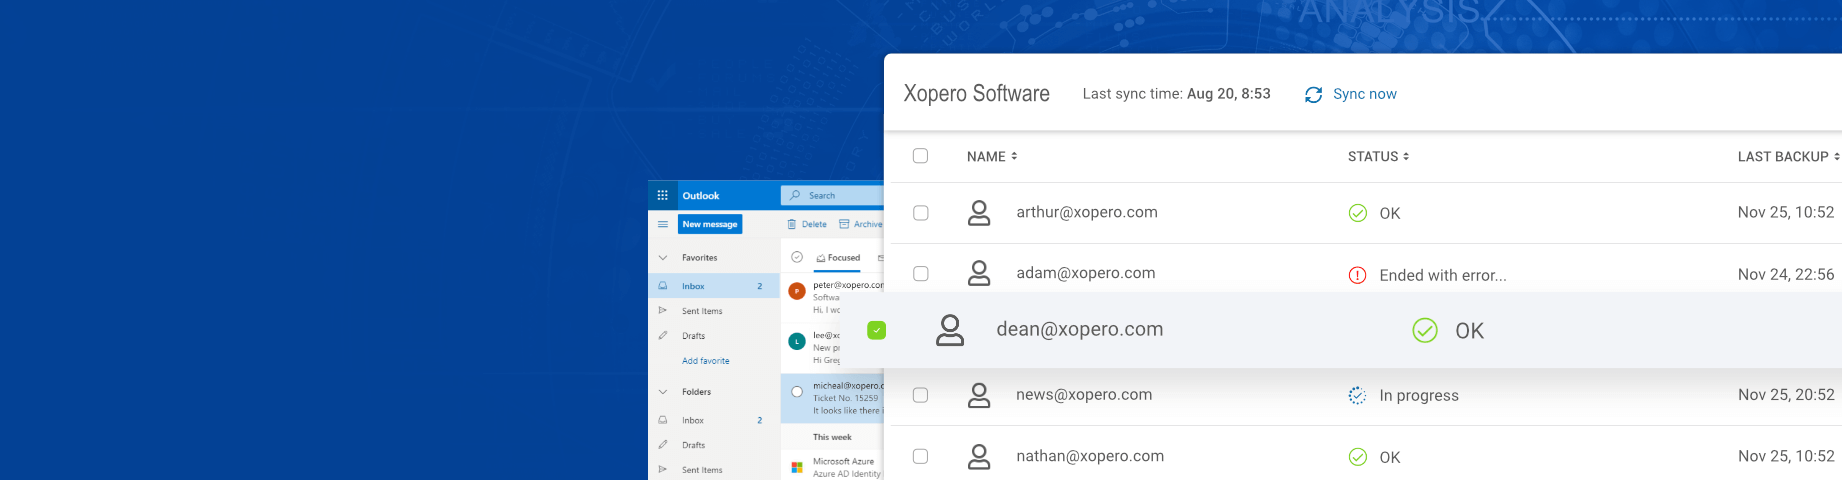
However, even the best configuration of Microsoft 365 data policies shouldn’t be considered as proper Microsoft 365 backup data. Using a third-party backup solution like Xopero Microsoft 365 Backup provides a wide range of technologies and features to make sure your data is protected and recoverable anytime you need it from every moment in time.
Xopero ensures data protection by offering the following features:
- Central, user-friendly management #1 – simple, the most intuitive central management web console. Thanks to the most user-friendly interface setting up efficient backup and recovering data are the simplest ever.
- Protect your Microsoft 365 data in minutes – add your entire organization, choose users and data to protect, storage (on-premise or cloud), and submit it to a predefined or customized backup plan.
- Unlimited retention – Store your data as long as you need and take advantage of multiple backup rotation schemes for long-term data retention – FIFO, Grandfather-Father-Son, Forever Incremental – choose yours.
- Granular recovery – fast, and point-in-time recovery of all or only selected types of data – folders, mailboxes, documents or even particular emails.
- Cross-user recovery – Restore protected data to the original user destination or choose a different one from your Microsoft 365 suite
and much more…