How to Convert VMware to Hyper-V: Guide to Available Methods
VMware has been steadily losing its market share to competitors like Hyper-V in recent years. With more and more companies considering the switch, we’d like to cater for this growing interest.
That’s why we’ve prepared the article showing you the options for migration between the two virtualization platforms and the actual steps to convert VMware virtual machines to Hyper-V ones. Let’s dive in!
Microsoft Hyper-V: A Brief History and Development
It all started in February 2003 when Microsoft acquired Connectix with its Virtual PC and Virtual Server products. To overcome their limitations, Microsoft launched the Viridian project whose goal was to develop a type 1 hypervisor that runs directly on hardware and is scalable, secure, and high-performing.
Hyper-V debuted in 2008 with Windows Server 2008, marking Microsoft’s official entry into enterprise virtualization. With the next iterations of Windows Server, major features, like live migration, virtual switch, integration with Microsoft Azure, or Linux support, found their way to Hyper-V. Speaking of OS support, we need to remember that Microsoft’s solution doesn’t support Apple’s macOS to date due to licensing restrictions and no official support.
Today, Hyper-V is a core component of Windows Server and Windows 11 Pro/Enterprise, integrating deeply with System Center Virtual Machine Manager (SCVMM), and other tools. It supports not only common, but also hybrid cloud scenarios and container workloads. Just like a native hypervisor, Hyper-V lets us create virtual networks, switches, devices, etc.
How the Two Virtualization Platforms Compare: Key Differences
In general, each virtualization solution shares similar technologies. However, to make an informed decision about virtual machines’ migration, it’s a good idea to learn about how these two differ. For this purpose, use our convenient table:
| Feature | VMware vSphere | Microsoft Hyper-V |
| Hypervisor | Type 1 (ESXi), very small footprint | Type 1, runs as a role in Windows Server, requiring a parent partition |
| Automated Load Balancing | Distributed Resource Scheduler (DRS)—highly advanced and automated. | Dynamic Optimization—good, but less advanced than DRS. |
| Zero-Downtime Failover | Fault Tolerance (FT)—creates a lock-step VM for instant, zero-downtime failover. | None—the standard High Availability mechanism provides a restart of virtual machines on another host (brief downtime). |
| Hyper-Converged Storage | VMware vSAN—mature, high-performance, with “Ready Nodes” support. | Storage Spaces Direct (S2D)—powerful, high-performance, but can be complex to configure. |
| Primary Ecosystem | Broad 3rd-party and strong multi-cloud (AWS, Azure, GCP). | Deep 1st-party (Active Directory, System Center, Microsoft Azure). |
| Guest OS Support | Exceptional—supports a massive range of Windows, Linux, BSD, macOS, and legacy OSes (e.g. Novell). | Good—optimized for Windows. Supports all major Linux distributions, including RHEL, Ubuntu, or SUSE. |
| Costs | Very High. Subscription bundles (e.g., vSphere Foundation) are required for all features. No free version. | Low to Medium. Hypervisor is free. Cost is tied to the Windows Server Datacenter license, which also covers guest OS licensing. |
Why migrate VMs from VMware to Hyper-V?
The decision to migrate VMware to Hyper-V is serious and undoubtedly requires careful planning. These days, it’s often related to financial and ecosystem-related factors:
- Cost—when you compare costly VMware subscriptions to the Hyper-V hypervisor (which is free and often bundled with a Windows Server license), the choice for any cost-aware organization is clear.
- Recent licensing changes—with an end to perpetual VMware licenses, massive cost increases in the subscription model, or the introduction of non-flexible bundles, to name a few, many organizations are now seriously re-considering competitive virtualization products like Hyper-V server.
- Investment in the Microsoft ecosystem—if your organization has already heavily invested in Microsoft solutions (e.g. Windows Server environments, Azure, Microsoft 365), the integration with Hyper-V will be seamless.
- Azure-based hybrid cloud strategy—if you’re building a hybrid cloud setup based on Microsoft Azure, it’ll also be easier for you to integrate with Hyper-V.
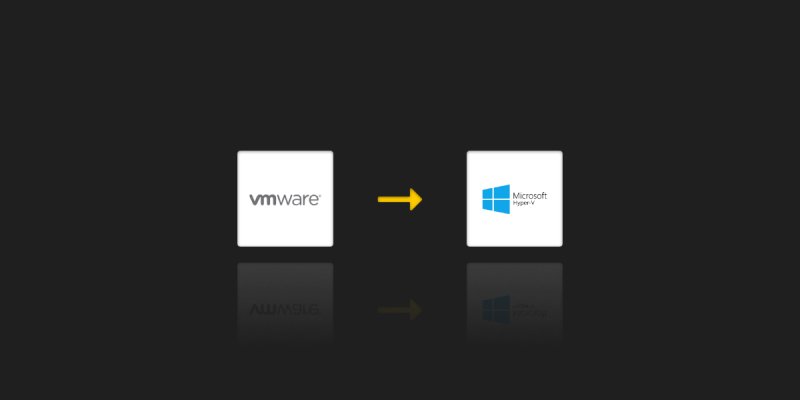
Can I Convert VMware to Hyper-V and What Options for Migrating VMs Do I Have?
Yes, the migration is of course possible. Consult the table below to choose the best option for your migration scenario. Click a link to go directly to a section discussing a given conversion method.
| Method | Difficulty | Use case (size) | Notes |
| Windows Admin Center (WAC) VM Conversion Extension (see steps) | Easy | Medium to small | Supports online/hot migration, minimizing downtime. |
| System Center Virtual Machine Manager (see steps) | Medium | Large to medium | Requires source VMs to be shut down, causing downtime. |
| StarWind V2V Converter—third-party free tool (see steps) | Easy | Medium to small | Supports online/hot migration, minimizing downtime. Works if you don’t have access to the entire VMware environment. |
| Backup tool with VMware and Hyper-V support (see steps) | Medium-difficult | Small / ad-hoc migration | Uses virtual machine backup and restore processes to migrate VMs. |
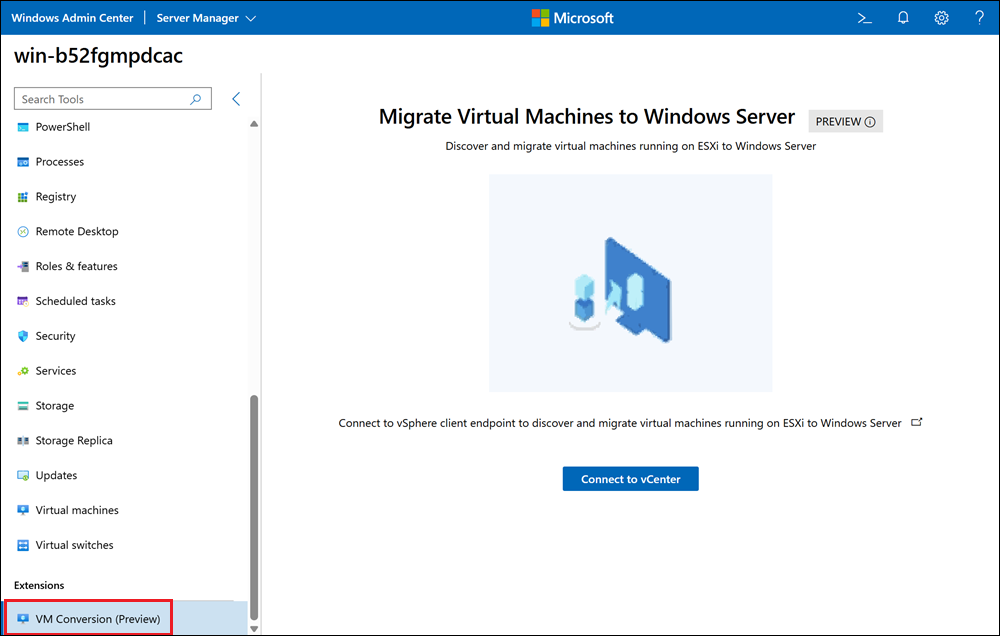
How to Convert VMware to Hyper-V with the VM Conversion Extension
VM Conversion Extension is an extension to the Windows Admin Center (WAC) web interface that enables seamless migration between the two virtual environments in question. This Microsoft Virtual Machine Converter (MVMC) successor is free and is OK to use with medium to small VMware environments, supporting batch migrations (up to 10 virtual machines at a time). It’s also an easy method, ensuring minimal downtime. For Windows VMs, the extension additionally supports the removal of VMware Tools.
Installing the VM Conversion Extension
WAC is a web console you can use to manage Windows Server from a client device. Using WAC settings, you can install extensions that add new functionalities.
Before installing the VM Conversion Extension, ensure that you meet the following preconditions:
- Installed PowerCLI—PowerShell module for VMware (learn how to do it).
- Installed Visual C++ Redistributable.
- Installed Visual C++ Redistributable Packages for Visual Studio 2013
- Downloaded VMware Virtual Disk Development Kit (VDDK) version 8.0.3 and its content extracted to C:\Program Files\WindowsAdminCenter\Service\VDDK.
- Installed the Hyper-V role (learn how to do it).
- Installed Windows Admin Center V2 (version 2410, build 2.4.12.10 or newer)
To add the VMware to Hyper-V conversion feature, open WAC and sign in to it. Go to Settings (cogwheel icon) > Extensions, search for “Conversion”, click the found item below the search box, and click Install.
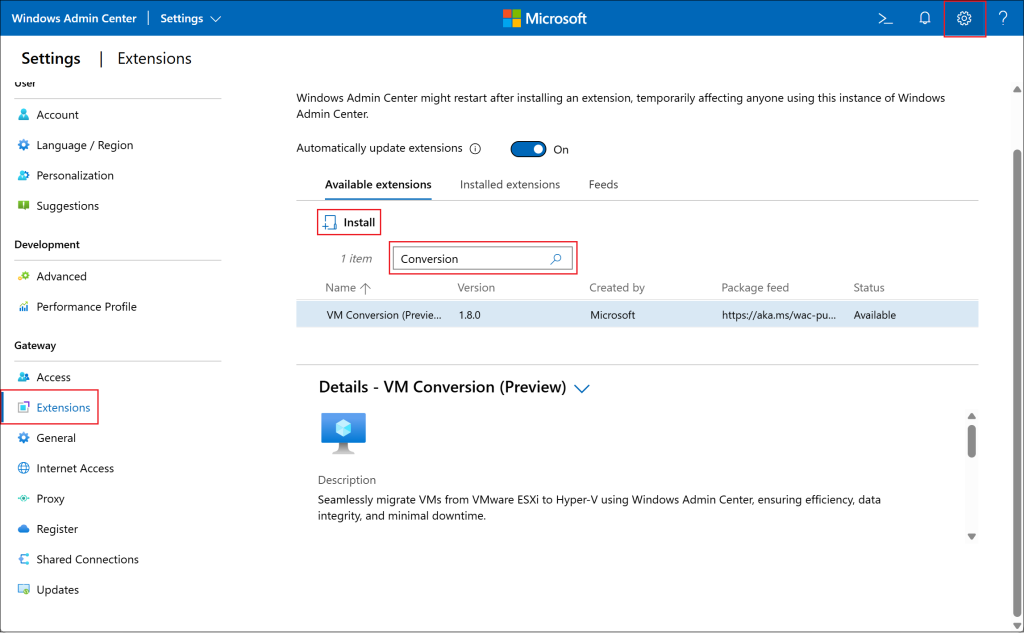
Once the extension is installed (restart might be required), you can find it at the very bottom of WAC’s main menu, under Extensions.
Running the Conversion Process
Before you actually start converting VMs, you need to make sure your source VMware environment meets the following prerequisites:
- VMware VCenter version 6.x or 7.x or 8.x.
- Supported guest operating systems: Windows Server 2012 R2 (or later), Windows 10, Debian-based OSes (Ubuntu Linux, Ubuntu 20.04, 24.04, Debian 11, 12), and RHEL-based OSes (Alma Linux, CentOS, Red Hat Linux 9.0).
Once you’re ready, follow the procedure from official Microsoft’s documentation. Here’s the outline of steps you actually need to perform:
- Connect to vCenter Server, providing server’s Fully Qualified Domain Name (FQDN), username, and password.
- Run pre-synchronization checks to test source and target environments, e.g. to verify if there’re no active VM snapshots, destination Hyper-V host meets minimum hardware requirements, etc.
- Sync the virtual machines from your source environment (you can select up to 10 VMs at once), providing the target path on your Hyper-V host.
- Run pre-migration checks in the target environment, e.g. to verify no naming conflicts exist, proper VHDX files have been created.
- Perform final migration on the extension’s Migrate tab.
- Check logs for any migration error messages.
If you come across any issues, you can consult Microsoft’s troubleshooting guide that lists the most common problems.
How to Convert VMs with System Center Virtual Machine Manager (SCVMM)
This native enterprise management tool allows you to control both VMware and Hyper-V environments. With built-in VMM V2V wizard, you can handle the conversion in the management console, enjoying rich options. The tool is suitable for large to medium virtual environments, supporting up to 100 parallel conversions. However, Microsoft recommends running migrations with batches of 10 at maximum to ensure higher efficiency.
Before you start, take a moment to study system requirements and limitations to avoid issues and disappointment:
- VMM supports ESX/ESXi and vCenter, versions 7.0 and 8.0. For VMM port and protocol support, see this detailed article.
- You can’t convert virtual environments managed through the VMware Workstation hypervisor (type 2).
- Conversion of virtual machines with virtual hard drives connected to an IDE bus is not possible.
- VMware Tools must be uninstalled from guest operating systems prior to conversion.
- You can’t convert VMware VMs stored on vSAN-type storage.
- SCVMM doesn’t support online conversion, so you need to shut down source VMs before starting the process.
For a detailed overview of applicable requirements and limitations, see this Microsoft’s article.
Adding vCenter server and source ESXi hosts to SCVMM
Microsoft provides official documentation for the conversion process. Refer to it to get a detailed guide. To learn about key steps and prepare for the process, see the steps listed below:
- Create “Run as account” (a container for a set of stored credentials), providing your vCenter server login details.
- In the VMM console, go to Servers > Add VMware vCenter Server in the Fabric left-hand menu.
- Provide vCenter server name and choose the “Run as account” created in step 1.
- Import server’s security certificate to verify its identity.
- After successful addition of the server, ESXi hosts should be listed in VMM. Right-click Servers (under Fabric) and choose Add VMware ESX Hosts and Clusters.
- Complete the Add Resource wizard to decide which VMs you want to add to your environment and where to store them.
- The host status must be “OK” after the import.
Converting VMware VMs to Hyper-V
The second phase of the process is the conversion itself. In general, it requires you to select desired virtual machines and run the Convert Virtual Machine wizard, specifying all the settings. To get detailed steps, refer to the official documentation. Note: For PowerShell savvy admins, the documentation also shows how to run the conversion with scripts.
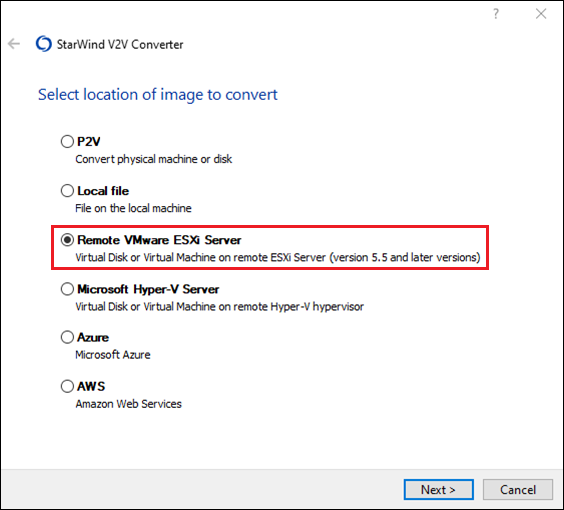
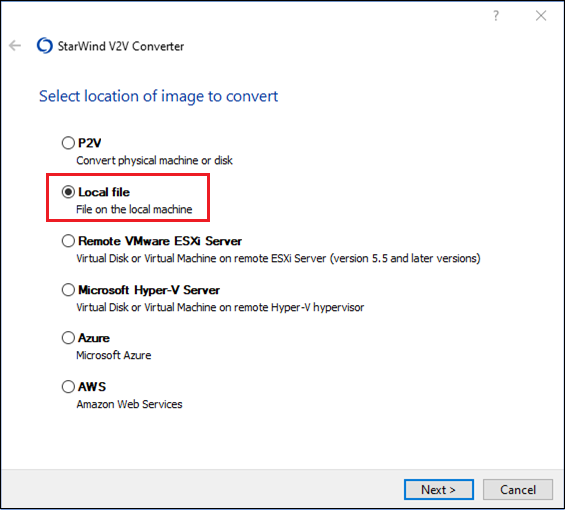
How to Use StarWind V2V Converter with ESXi Host
StarWind V2V Converter is a free tool that allows for direct conversion from ESXi host, as well as converting VMDK to VHDX and then configuring a VM. It will excel at small to medium conversion scenarios.
Here’re the basic requirements and limitations of the converter:
- Supported file types: VMDK (for VMware), and VHD/VHDX (for Hyper-V).
- Supported ESXi version: 5.5 or later
- Supported Hyper-V setup: Windows Server 2008 R2 or later with installed Hyper-V Server.
The tool can run online/hot VM migration, thus minimizing downtime in source. To get a step-by-step walkthrough for direct ‘hot’ migration process, follow this guide, choosing Remote VMware ESXi Server.
If you have access to VMware virtual disk VMDK files only, read this local file conversion guide and go for the Local file option instead to obtain disks in the Hyper-V format.
How to Migrate VMware with Backup and Recovery Software
If you’re using our backup software, Xopero ONE Backup&Recovery, you can use its graphical user interface to: backup an entire VMware VM, restore it to the VHD/VHDX disk image file, and use the file to create a new Hyper-V VM, no scripting nor coding required.
While this method is not intended for bulk migration scenarios, it might come in handy if you’re using our backup software anyway, but need to perform one-off VMware to Hyper-V migration. Note: This method is currently possible only for VMs with Windows guest OS; the Linux support is to be added soon.
Here’s how to do it:
- From the Xopero ONE management console, download agent installer for physical Windows Client/Server (depending on the OS of the to-be-migrated VM). To do it, go to Devices > Select and choose appropriate installer version. The screenshot below shows steps for Windows Client:

- Run the installer on the VMware VM you want to migrate to install the Xopero ONE agent. Our knowledge base shows instructions for Windows Server, but you can follow them for Windows Client as well.
- Next, activate the agent in the Xopero ONE management console, as shown here.
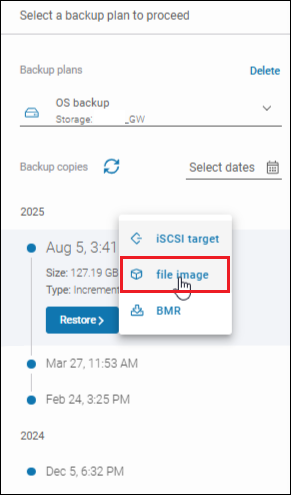
- Now, you‘re ready to start the migration process. First, backup your VMware virtual machine as a disk image. To do it, follow the backup plan wizard, remembering to go to Devices > Select (next to Whole OS) > Individual devices.

- Once your VM is backed up, initiate the recovery process using either of the two methods discussed here. In step 3 of the procedure, remember to choose the File image option.
- Continuing the procedure for file image, select the disk(s) you want to restore and click Restore selected.
- Under Image format, choose the desired Hyper-V disk format (VHD or VHDX).

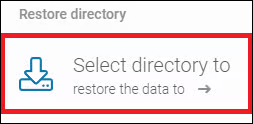
- The final thing you need to take care of in Xopero ONE is choosing where you want to save the output image file. If your server/endpoint with the Hyper-V environment has been added to our backup software, click Select directory to restore the data to, choose the server/endpoint from device list, and browse to the folder where Hyper-V VMs are stored. Otherwise, choose any convenient location that you’ll be able to manually move the image file from after completing the restore operation. Note: Make sure you have enough disk space to accommodate the entire VM disk image.
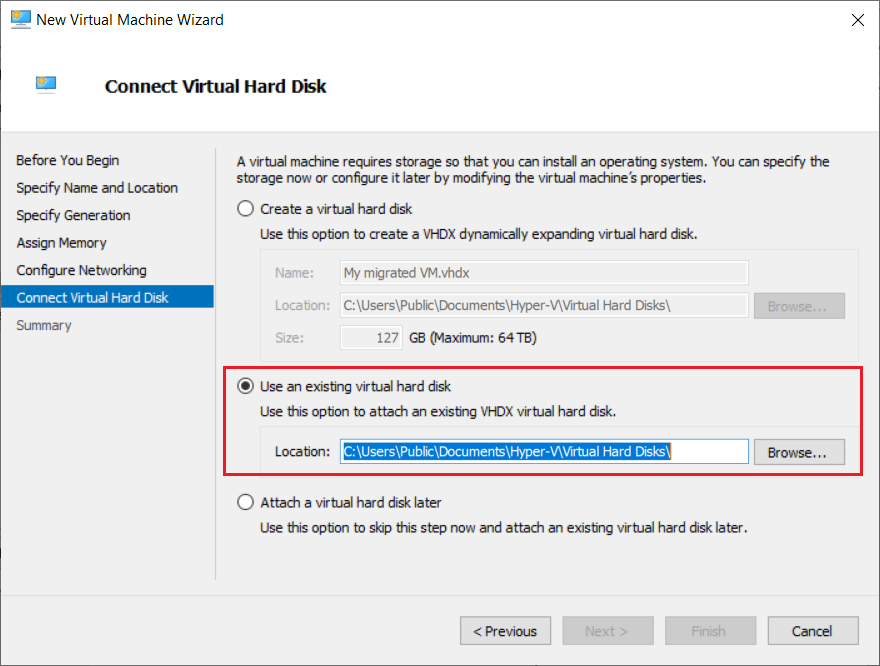
- Finally, create a new VM in Hyper-V Manager, as discussed in this Microsoft help article. In the Connect Virtual Hard Disk step of the wizard, remember to use the Use an existing virtual hard disk option, browsing to the location of your VHD/VHDX image file. Finish configuring your VM to complete the migration.
Concluding the Process: Post-Migration Checks
When a virtual machine or machines are migrated and VM files are in the target locations, the verification stage begins. There are a number of things you need to take care of as an IT administrator:
- Uninstall VMware Tools that are not compatible with Hyper-V and can cause issues like Blue Screens of Death (BSOD), poor network/disk performance, etc. on the migrated virtual machines.
- Install Hyper-V Integration Services (the counterpart of VMware Tools) on virtual machines to ensure driver stability and enable key Hyper-V features like Time Synchronization.
- Remove ‘ghost’ hardware (e.g. old VMware NICs) in Device Manager to avoid resource conflicts.
- Optimize performance by checking configurations (CPU, RAM memory settings), comparing it to pre-migration ones, and tracking key counters in Hyper-V host.
- Make sure VHDX files are attached to an SCSI controller (not legacy IDE one) to ensure optimal disk performance.
- Verify network settings by ensuring that virtual NICs are connected to correct virtual switches and testing connectivity through ping and nslookup cmdlets in command prompt.
- Test if Live Migration and High Availability work correctly, using Failover Cluster Manager.
- Ask application owners to sign in to apps on their virtual machines and perform standard tests.
- Re-configure VM backups—previously used VMware backup jobs are now useless. If you weren’t particularly satisfied with your backup tool, it might be a great moment to make the switch, too.
Xopero ONE Backup&Recovery: Your Backup Solution for Hyper-V
You swap virtual environments, but your approach to data security should not change at all. Virtual machine backups are critical to ensure business continuity and avoid painful financial and reputation losses, penalties, and other dire consequences.
Switching VMware to Hyper-V might be a perfect moment to choose a new VM backup solution that seamlessly integrates with Microsoft’s virtualization ecosystem. Xopero ONE Backup&Recovery (XONE) is a well-established and versatile software platform that you can use to protect Hyper-V virtual machines, local and cloud Microsoft products (Windows, Windows Server, and Microsoft 365), as well as other environments in your organization (Linux, macOS, VMware, DevOps platforms, Jira). XONE comes with a host of features that work to your advantage and security, such as AES256 copy encryption, MFA, granular access control, deduplication, compression, multi storage support, copy replication, backup schemes, scheduler for automated backups, test recovery, or instant disaster recovery, to name a few.
And if you need an enterprise-grade all-in-one appliance that provides data immutability with logical or physical data isolation (air gap backup), go for Xopero Unified Protection. Enjoy all the features of Xopero ONE together with best-in-class hardware protection against ransomware. Stay safe now and in the years to come.