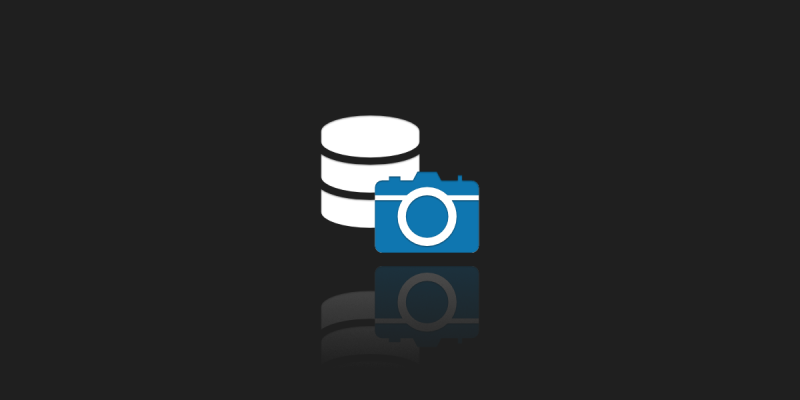
VMware Snapshot Technology: What Is It and When to Use It?
Even though VMware has been recently losing its virtualization market share, it’s still the leader with approximately 40%. This means that the products like VMware ESXi or vCenter Server (collectively VMware vSphere) are continuing to be the leading virtualization solutions, with VM snapshots being one of the most valued features.
Let’s go through the key questions to discover what a VMware snapshot is, why it is not a backup, how to handle snapshots, and more.
What Is a VMware Snapshot in Simple Terms?
A VMware snapshot is a saved state of a virtual machine (VM) at a specific point in time. It captures the state of VM disk and settings, and can optionally include its memory and power state (VM running, suspended, etc.). It lets you easily revert the VM to that specific point in time whatever your reason might be: a test, a failed update, troubleshooting an issue, etc.
VMware snapshot is a flexible technology—you can create a snapshot regardless of whether your VM is powered on, powered off, or suspended. Note: Snapshots are not supported for RAW and RDM physical disks. For independent disks, you can create snapshots manually only when a VM is powered off. But it’s more of a backup of a disk file.
What Happens When a Snapshot Is Taken?
When you use the snapshot feature in VMware vCenter, the following things take place:
- Your ‘base’ virtual disk enters read-only mode and is kept in this mode for as long as its snapshot or snapshots exist. This ensures its state remains unchanged.
- From that point on, the newly created snapshot is where all new changes are recorded. The snapshot consists of the following files:
- Delta VMDK file—a type of snapshot file that holds the changes to the virtual disk’s data from the time the snapshot was taken. It’s also called ‘child disk’ or ‘delta disk’.
- VMSD file—a database to track snapshot metadata and hierarchy.
- VMSN file—a type of snapshot file that holds VM’s RAM contents from the time the snapshot was taken (if the memory snapshot is enabled).
- When another snapshot is taken, the previous snapshot becomes read-only, preserving the VM state at the moment of taking the new snapshot. The above mentioned files are created for the new snapshot to collect subsequent changes and keep metadata.
All these files are linked together in a delta disk chain or a snapshot chain, which tracks the history of changes made to the VM files over time and is crucial for proper snapshot management and data restoration.
What Are Use Cases for VM Snapshots?
Snapshots come in handy in situations where VMs need to be quickly restored to a previous or clean state. What do we mean here in particular?
- Testing software/updates—you can test new apps or latest patches to see if they cause problems or break your OS. If necessary, you can quickly go back to the state of the VM before the installation.
- Troubleshooting—using VM snapshots can help investigate issues through capturing a known-good state before making changes.
- Training/demos—you can reset a VM for salespeople, product managers, etc. after each presentation or session to prepare it for another one.
- Software development—in testing environments, developers, testers, etc. can quickly go back to a clean environment to start testing an app/feature from the beginning.
How to Take Snapshots in VMware?
Creating a snapshot is one of the common operations that can be performed while a VM is powered on or off. As a result, IT administrators do not have to plan any technical breaks to do it.
The process itself is fairly easy and involves just a few clicks:
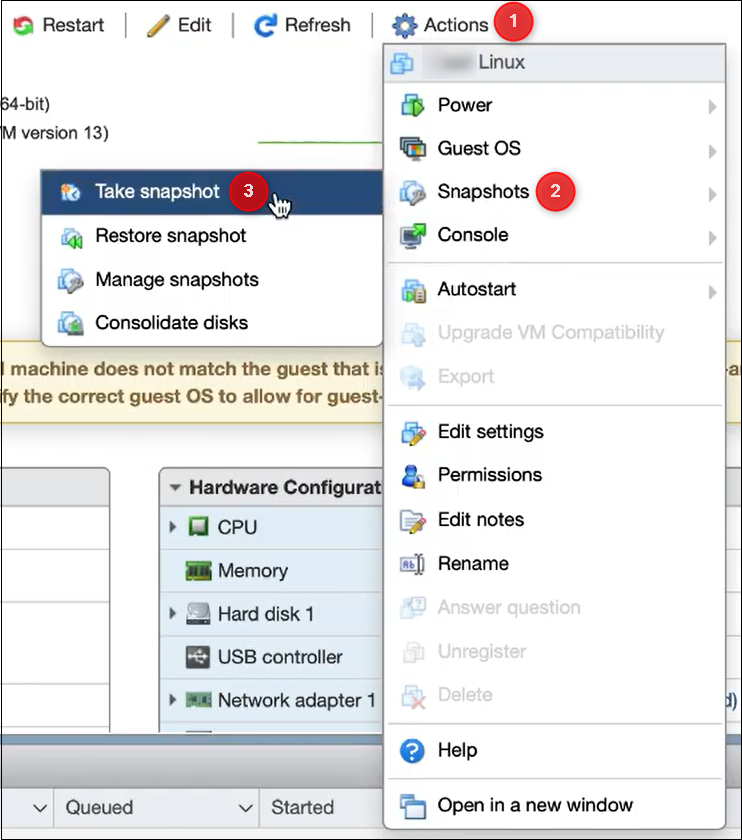
- Click a VM in the Navigator pane on the left. In the VM’s detailed view, click Actions and go to Snapshots > Take snapshot.
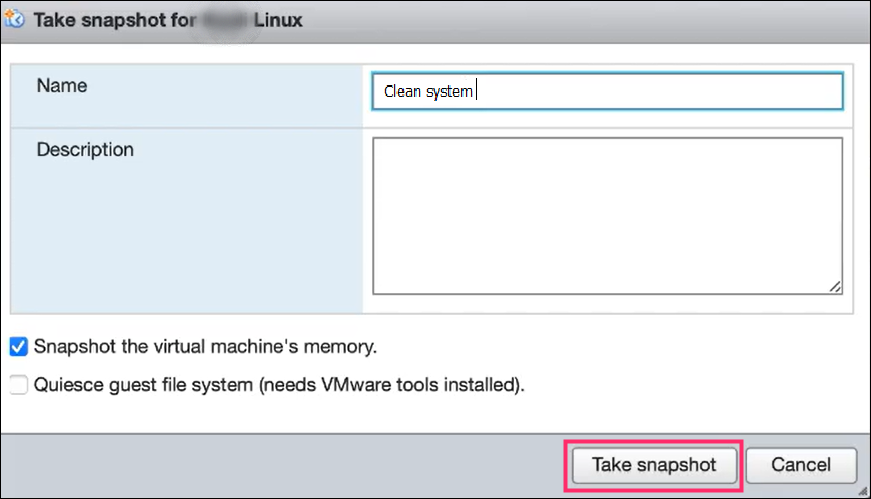
- In the popup that opens, provide a meaningful snapshot name and description. Choose if you want to take a snapshot of the VM’s memory or quiesce the guest’s file system. Finally, click Take snapshot to finish.
How to Track and Restore VM Snapshots?
As mentioned earlier, each subsequent snapshot forms a snapshot chain. You can use Snapshot Manager to manage snapshots, monitor the chain, and perform actions such as reverting or deleting snapshots.
How to Manage and Monitor VMware Snapshots?
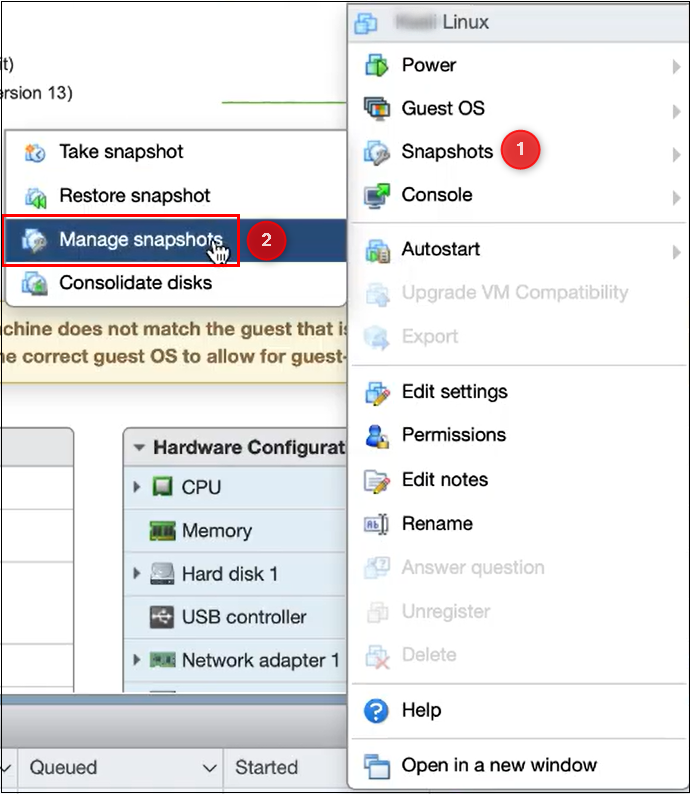
You can use the same menu to access Snapshot Manager. Just go to Snapshots > Manage snapshots.
In the manager, there’s a visualization of the entire snapshot chain for your VM. Thanks to that, you clearly see the sequence of snapshots, which snapshot is the latest, and so on. The picture below shows a simple chan. However, there may also be VM snapshot trees, where at least two chains originate from a single snapshot. A tree can be created when a user reverts to an older snapshot and then creates a new one that forms a new branch.
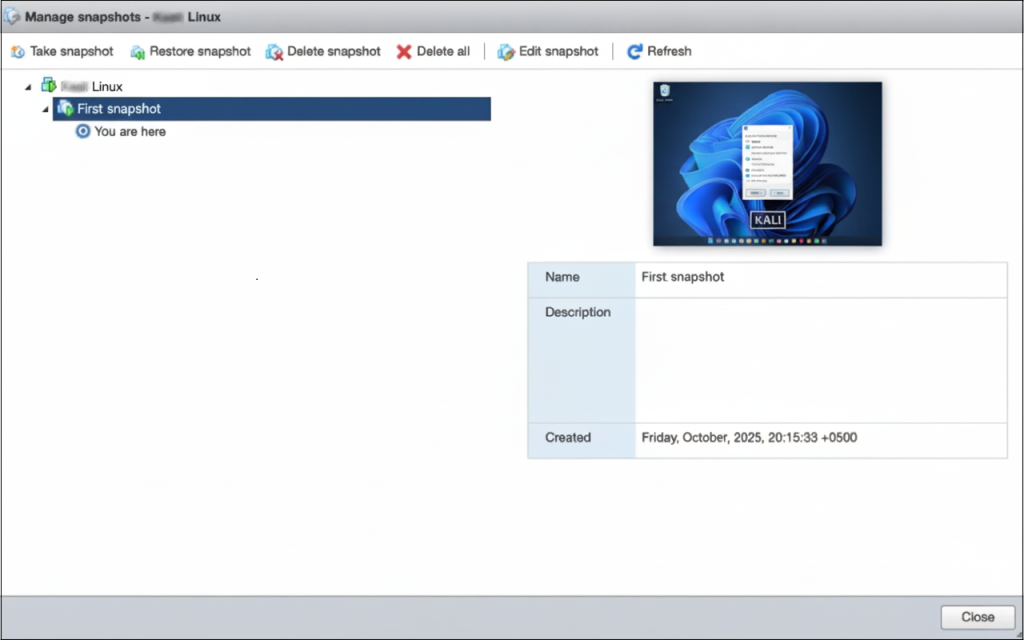
Clicking a snapshot in the chain reveals all its details: the name, the description, and the screenshot. You can also perform several actions like deleting, deleting all, editing snapshot details, restoring, etc.
It’s worth mentioning that the process that takes place after deleting a snapshot is called consolidation. During the consolidation, data from the snapshot(s) delta disk(s) is merged back into the base/parent disk.
Also, the Delete and Delete All operations often confuse users. The first one consolidates (aka merges/commits) the current snapshot into its parent, while the other does the same for the entire disk chain.
How to Restore a VMware Snapshot?
If you experience a failed update, issues after installing specific software on your VM, etc., you can use the VMware snapshot feature to go back in time when the problem wasn’t there. Note: Remember that by restoring a snapshot, you’ll lose all the progress/changes made since taking the snapshot.
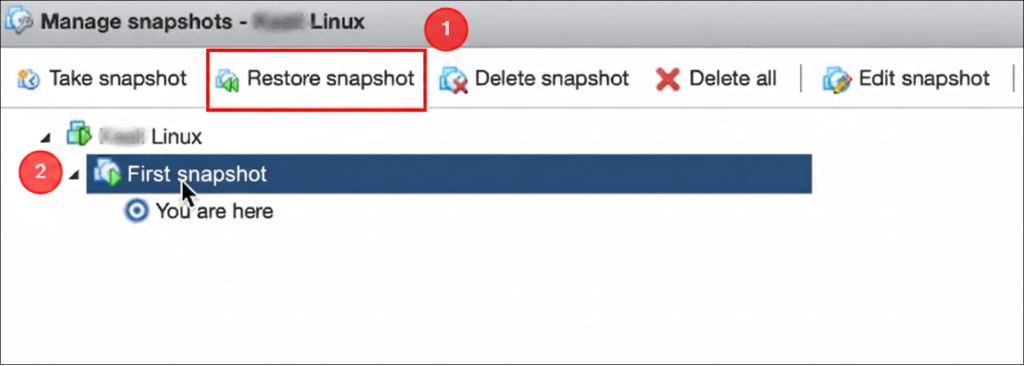
You can revert to the desired snapshot using the Snapshot Manager. Access it in the same way as shown above (Actions > Snapshots > Manage snapshots).
In the manager, click the desired snapshot in the snapshot chain to select it, and click Restore snapshot. Finally, accept the warning message to restore your snapshot.
What Are the VMware Snapshot Best Practices?
When managing multiple VM snapshots, it is important to follow best practices to avoid performance issues and maintain data integrity. Read on to learn how to take care of your VMware snapshots.
Use Snapshots for Short-Term Purposes Only
How long should you keep a VM snapshot? In short: Short. The VMware documentation advises that a single snapshot shouldn’t be kept for more than 72 hours. But if you use the VM extensively, it must be much shorter than that. This is due to the fundamental design of snapshot technology. Having snapshots for a given machine for more than a few hours isn’t desirable for a number of reasons.
First, you need to remember that if your virtual machine is active, delta files in the VM directory are constantly being written to. This means that the longer you keep them, the larger they become, so your ESXi server needs to allocate more resources to manage the files. Excessive disk usage and disk space consumption by these growing snapshot files can negatively impact VM performance and increase the risk of corrupt snapshots. For example, it’s possible for the delta VMDK files to grow larger than the original virtual disk itself. Now imagine that such a snapshot needs to be removed or consolidated. In such cases, these operations can take days, and, in extreme cases, even longer!
Second, with snapshots in place, VM management becomes problematic. VMware will make it very difficult to increase the original VM’s base disk size or migrate to another host, especially if there are large or multiple snapshot files. And this might get more complicated during periods of rapid data changes.
Keep Snapshot Chains Short
The second factor to consider is the number of virtual machine snapshots, as this can hugely impact VM performance. Each child/delta disk in the chain is dependent on previous one. To read the current state of the VM, VMware has to process the entire chain. As a result, if there are several snapshots, each read/write operation must traverse the chain, which significantly degrades system performance.
Also the processes of deleting a snapshot, going back in time to a selected snapshot, or consolidating snapshots run by vCenter server or vSphere client take much longer when the snapshot chain is long.
For these reasons, the official VMware documentation doesn’t recommend having more than 3 snapshots for a single VM.
Include Memory Snapshots Only When Necessary
Using memory VM snapshots adds fidelity by including information about the contents of VM’s RAM, CPU state, and power state. Memory snapshots can be useful, for example, when you want to have VMs powered on right after the restore. Note: When using a non-memory snapshot, the VM will always be restored in a powered-off state.
However, if you can sacrifice fidelity and power state preservation, using virtual machine snapshots without the memory ‘component’ can bring considerable savings in terms of restore time (no need to load memory contents) and disk space (you can save several gigabytes).
Use Quiescing for I/O-intensive VMs
If you want to take a snapshot of a guest OS and guest file system with intensive input and output operations (e.g. a database server), it’s a good idea to use the quiescing feature available with VMware Tools. This mechanism stabilizes or pauses VM’s running processes to ensure clean and consistent state of data and avoid data loss, corruption, or inconsistency.
Monitor and Clean up VM Snapshots
Monitoring and cleaning up VM snapshots is equally important—in particular, to avoid consequences mentioned in the first two sections above. Usually, you can do this by regularly consolidating or merging data back to the base disk through the in-built Snapshot Manager.
If your virtual environment is large and you find it difficult to coordinate these activities, you should think about automations. For example, if you use VMware on Windows Server, you can import the PowerCLI module into PowerShell and then run scripts to list snapshots, filter them by age, automatically delete snapshot files older than a set number of days, and more.
Have a look at the sample scripts that you can use:
# List all virtual machine snapshots

Get-VM | Get-Snapshot

# Find snapshots older than 10 days

Get-VM | Get-Snapshot | Where-Object {$_.Created -lt (Get-Date).AddDays(-10)}

# Remove old snapshots

Get-VM | Get-Snapshot | Where-Object {$_.Created -lt (Get-Date).AddDays(-10)} | Remove-Snapshot -Confirm:$false
Name Snapshots in a Meaningful Way
This good practice comes in handy not only when your VM environment is large. Descriptive names always help avoid mistakes and unnecessary data loss. For example, use ‘Pre-Windows-October-2025-Update’ instead of ‘Snapshot 1.’
Never Use Snapshots as Backups
Snapshot is not a backup. It’s more of a version control mechanism that helps you revert to a safe state if something unexpected happens. Read on for detailed explanations.
Is a VM Snapshot a Backup?
People often ask a question: “What’s the difference between backup and snapshot in VMware?” Technically speaking, a snapshot file is only a ‘changelog’ of the original virtual disk that stores changes since the time of snapshot creation. If the base disk gets deleted, the snapshot files are not sufficient to restore a virtual machine.
So, a VMware snapshot captures the exact state and data of a virtual machine at a specific point in time, but it is not a replacement for a true VM backup, which creates a self-contained, independent copy for reliable data recovery.
It’s worth noting that snapshot best practices recommend deleting snapshots promptly after a backup is completed to avoid performance issues and ensure you can recover data if needed. This is how virtually all backup tools supporting VMware environments work.
Let’s Summarize: What Are the Pros and Cons of Snapshots?
Having discussed VMware snapshots in detail, let’s recap the primary advantages and disadvantages:
✅ Quick creation—takes place almost instantly by creating only small delta files and modifying VM’s properties.
✅ Instant rollback—you can revert a virtual machine to a previous state in seconds or minutes.
✅ Quick failsafe mechanism—VMware snapshots are a perfect safety net before performing risky operations.
✅ Test-friendly solution—snapshots are very useful for experimenting with apps, updates, and so on.
❌ Performance degradation—as a snapshot ages and grows, VM performance gets degraded.
❌ High storage consumption—snapshot’s delta files can grow rapidly and eventually consume massive amounts of disk space.
❌ Long consolidation—after deleting a VMware snapshot, data changes must be merged back to the base disk, which might be time-consuming, resource-intensive, and sometimes prone to failure.
❌ Single point of failure—snapshots are dependent on the original base VMDK file, and any failure of the file renders the snapshots useless.
How Can I Reliably Protect My VMs Data?
You might have come here to see if you can use snapshot to back up your VMs. Hopefully, you’re now convinced that a snapshot isn’t equal to a backup. Let’s summarize why:
| Snapshot | Backup | |
| Purpose | Immediate rollback / Safety net for changes. | Long-term disaster recovery / Archive. |
| Dependency | Dependent on the original VM’s files. | Independent, self-contained copy. |
| Retention | Very short-term (hours/days). | Long-term (weeks/months/years). |
| Location | Typically stored on the same datastore as the VM. | Stored on separate media (disk, cloud, NAS), often off-site. |
So, if you’ve already taken care of a snapshot strategy, but you’re still looking for a reliable VM backup solution, Xopero Software offers both hardware and software-based tools for the ultimate protection of local, cloud, and virtual environments.
Choose Xopero Unified Protection (XUP) if you need a comprehensive enterprise-grade backup&recovery appliance to safeguard all your organization’s critical data, make it ransomware-proof with Air Gap backup isolation & immutable backup, and enjoy centralized management using an intuitive web console. In terms of VM backup, XUP will also take care of the disk consolidation and make sure that no stray snapshots are left.
If you have your own dedicated backup storage, you can go for the Xopero ONE Backup&Recovery software platform (which is, by the way, a part of the XUP experience). This tool offers a holistic approach to security (encryption in transit & at rest, MFA, compression, replication, and more), includes features like deduplication, recovery testing, granular recovery, etc., and lets you centrally manage all your backups, regardless of source and storage. Before making a decision, you can test Xopero ONE for 14 days for free.