Best Practices for Efficient Microsoft Hyper-V Backup Strategy
Virtualization brings lots of advantages: reduces load, optimizes resource utilization, increases process flexibility, and facilitates business continuity. Still, similar to physical environments, it’s susceptible to various kinds of modern digital threats like AI-assisted attacks or ransomware campaigns that end up with double or triple extortion.
With Hyper-V being currently the second-largest player in the virtualization market, it’s likely you maintain your instances of a Hyper-V host, looking for ways to secure them. That’s why today we will talk about Hyper-V backup best practices, both from strategic and technical point of view.
#1 Do Not Rely on Hyper-V Checkpoints for Data Protection
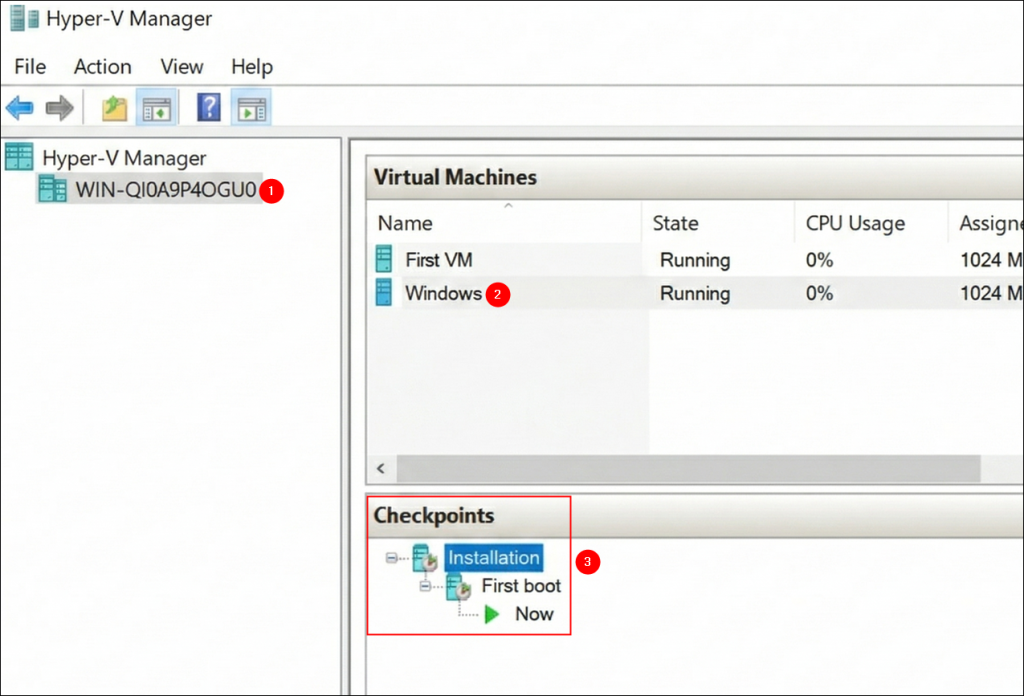
If you manage Hyper-V, you should know what checkpoints are. For those transitioning from Vmware, these are the counterparts of Vmware snapshots. For a complete novice to virtualization, a checkpoint is a saved state of a virtual machine at a specific point in time that allows you to revert the entire VM to that original state, regardless of the reason (a failed update, a test environment reset, etc.). Tip: In Hyper-V Manager, you can see the checkpoints created for a VM by clicking it:
No matter how tempting it might be, Hyper-V checkpoints cannot replace dedicated Hyper-V backup software. They are a kind of a change log for a VM rather than a form of a full, permanent, and secure backup. In fact, they become useless the moment the virtual machine they seemingly protect breaks down.
What’s more, customers reported cases where checkpoints simply ‘disappeared’ from their server… and all data with it! Even Microsoft doesn’t recommend using checkpoints on Hyper-V virtual machines that provide time-sensitive services, or when performance or the availability of storage space is critical.
The bottom line: Use a professional tool to backup and restore your Hyper-V virtual machines like, for example, Xopero ONE.
#2 Divide and Conquer… Literally
One Role for Each Hyper-V Guest
The Microsoft Hyper-V virtual machine backup and recovery process can become complex when a single VM is assigned multiple Microsoft Exchange Server roles (e.g., AD Server, SQL Server, File Server). What’s more, multi-role VMs can be a reason for corrupted backups, recovery conflicts, and prolonged restores.
To simplify the recovery process and ensure efficient management, each virtual machine should serve a single role or run a single application.
Physical Hyper-V Server Only As the Host Server
The Hyper-V host server should also have a single role, which is… (surprise, surprise!) Hyper-V Host and absolutely nothing else.
Any issue affecting another role or application on the Hyper-V host has the potential to impact the guests. For instance, a routine patch required by a print server coexisting with the virtualization host might necessitate a physical server reboot, leading to an outage for all Hyper-V guests (VMs) and the services they offer.
So, what’s your takeaway? Do not put any non-Hyper-V applications or data on your Hyper-V host server—they should be on another physical server or on one of the Hyper-V virtual machines (guests).
Protect Hyper-V Host Server
It’s also crucial to avoid storing Hyper-V guest data (VHDs or VHDXs) on the same volume where you’ve installed Microsoft Hyper-V Server or where the physical server’s operating system resides.
For instance, if your physical server uses the C: drive, it’s best practice to allocate separate volumes for Hyper-V guests, ensuring they don’t share space with system files like, for example, the physical server’s SWAP file.
This segmentation is essential not only for optimizing performance but also preventing potential conflicts between server’s OS operations and guest virtual machine operations. An incorrect approach may result in problems when you need to backup data, after your Hyper-V host fails.
#3 Make Hyper-V Backup Process Faster and Reduce the Infrastructure Impact
With professional Microsoft Hyper-V backup software like Xopero ONE, you can use features that allow for faster, more efficient, and ‘invisible’ virtual machine backup process, without impacting existing infrastructure.
Take Advantage of Agentless Backups
Choose backup software that supports host-level (agentless) architecture for faster and more effective Hyper-V backups.
Without the agentless approach, you would need to install a backup agent and run a separate backup job for each VM within your host. With Xopero ONE supporting the host-level backup, you save much time and avoid a lot of unnecessary work; you are also able to restore all data (configurations, disks, etc.) much more quickly.
Note: For the best backup speed and reliability, combine the agentless approach with the previous tips on a single role assignment, both when speaking of VMs and the Hyper-V host server.
Choose the Fastest Data Transport Method
To prevent overloading the network bandwidth of your VMs, the best option is to choose the LAN-free transport method. While this one needs extra configuration, which are a SAN network and Xopero ONE worker to perform backup tasks outside of the Hyper-V environment (for example, on a physical server), the backup speed increase and resource savings are worth it.
Xopero ONE also offers the Automatic transport method. In that case, our backup software will automatically choose the best (fastest and most efficient) transport method for your Hyper-V virtual machines.
Schedule Hyper-V Backups Carefully
When multiple virtual machines are backed up simultaneously on the same host, it can affect the performance. By carefully scheduling backups, you can prevent resource overload and maintain optimal performance for your virtual machines.
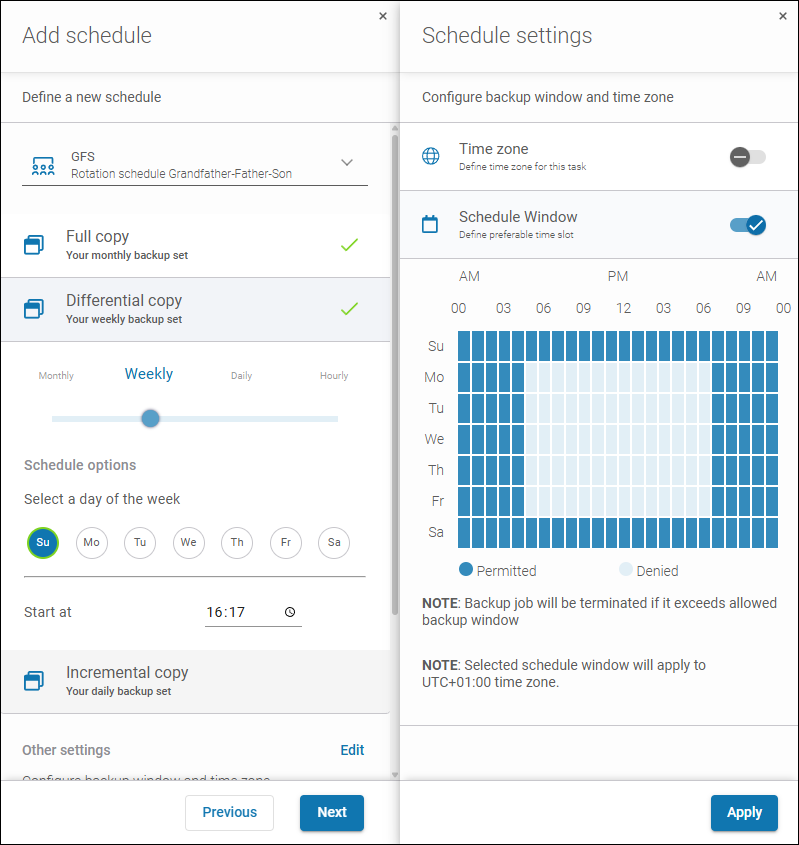
With Xopero ONE, you can run Hyper-V backups based on set monthly, weekly, daily, or even hourly schedules. You can also define the exact time range when Hyper-V backups are allowed, e.g. outside the organization’s working hours.
What’s more, Xopero ONE offers more tools to automatically keep infrastructure load under control, such as limiting the number of simultaneous tasks or network bandwidth.
Learn more about automated backups and the scheduler built into Xopero ONE
Ensure Efficient Incremental Backups
You don’t need to create full backups all the time, since it takes a long time, overloads infrastructure, and uses up a significant amount of space.
Thanks to the native Hyper-V technology called Resilient Change Tracking (RCT), you can run incremental image backups much more efficiently. The principle behind it is simple: you transfer only changed data instead of the entire VM image.
To benefit from RCT, your VM Configuration Version must be 8.0 or later. You can check it by running this PowerShell cmdlet on your Hyper-V host:
Get-VM | Select-Object Name, State, Version
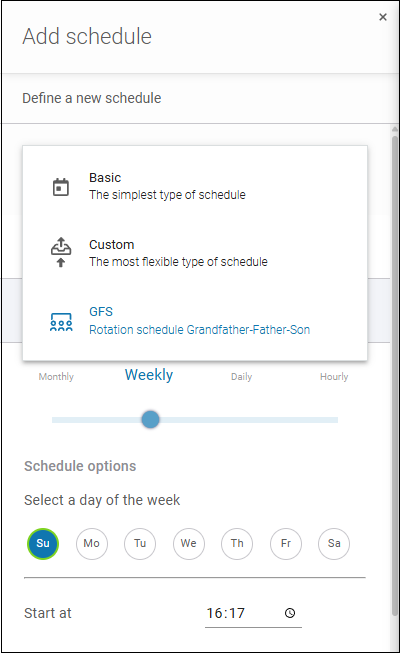
In addition to supporting RCT, Xopero ONE offers several backup schemes, such as Basic, Custom, and Grandfather-Father-Son (GFS) to help you control backup policy.
#4 Maintain Data Integrity with Application-Aware Hyper-V Backup
With the Volume Shadow Copy Service (VSS), your Hyper-V backups include all data, even the data from active and data-intensive apps/resources (e.g. an SQL database), so you have a guarantee that your copy is complete, consistent, error-free, and can be restored with no issues.
The working principle is as follows: Backup software tells Hyper-V VSS Writer on the host to prepare for a backup. Then, using Hyper-V Integration Services, the host contacts each guest’s VSS service to pause operations and commit data to disk. During this short pause, a VM checkpoint is taken that is a basis for a full and faithful data backup.
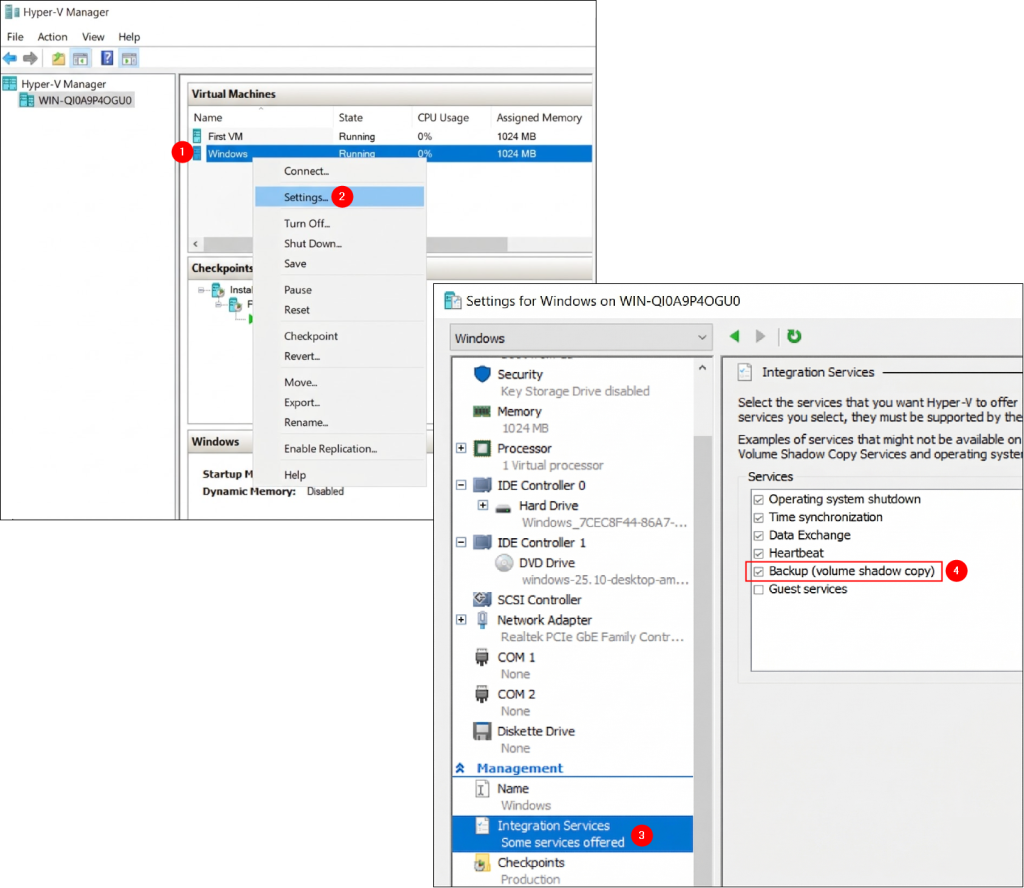
VSS is a part of Hyper-V Integration Services. If they are not installed or enabled, a guest will offer less accurate crash-consistent backups. To check if the services are available on a given VM, open Hyper-V Manager and:
- Right-click the VM and choose Settings.
- Under Management, click Integration Services.
- Ensure Backup (volume shadow copy) is checked
Xopero ONE supports VSS, so your Hyper-V backups will always include the most accurate data, even from the most data-intensive apps and resources.
#5 Choose Microsoft Hyper-V Image Backup for Best Consistency
Maintaining Hyper-V backup consistency is paramount for successful data restoration. When creating backups, it’s crucial to ensure that the data remains intact and easily recoverable.
File-level backups pose a risk of data inconsistency. That’s because data may change during transferring, potentially resulting in discrepancies between server and backup files, or even data corruption.
To mitigate the risk, use image-level backups instead. These leverage Hyper-V checkpoints to accurately capture all virtual machine data in a consistent state.
#6 Follow the Backup 3-2-1 Rule to Prepare for Any Scenario
The most well-known concept in the backup strategy is the 3-2-1 rule. What is it actually about? In short: “keep 3 copies on 2 types of media with 1 copy offsite”.
First of all, 3 copies of your Hyper-V virtual environment (together with Windows Server) protect you against simultaneous data loss across different backup storage locations. Yes, such a scenario is indeed possible!
Using 2 types of media (backup storage), for example a cloud service and a physical server, is about not having a single point of failure. Two identical devices are more likely to experience the same failure compared to two distinct and independent ones.
Finally, using an offsite backup location protects you against risks that can affect your entire IT infrastructure at your office, e.g. flood. We recommend using cloud storage like Xopero Cloud, AWS, Wasabi, or other trusted providers.
And if you want to follow the latest and the safest backup concepts like 4-3-2 or 3-2-1-1-0, check out our blog article for more information.
#7 Mind Technical Specifications and Disk Space
Remember, that VM backup speed will be equal to the one provided by the slowest component. That’s why, you should adequately provision resources in Hyper-V Manager to ensure that the Hyper-V backup processes operate smoothly and efficiently.
The choice of disks can significantly influence the backup performance. Therefore, we recommend you opt for fixed virtual disks on your Hyper-V host server. Unlike pass-through disks, which introduce complexity and limitations on VM snapshots and Hyper-V backups, and dynamic and differencing disks, which impose performance and space overhead, fixed disks enable enhanced performance and data integrity.
Last but not least, you can’t provision additional disk space for backup copies out of thin air. That’s why, the capacity of your cloud storage or storage device should be adequate to cater to your Hyper-V backup needs.
The same applies to the recovery side. In the case of a bare metal restore (BMR), make sure that the target Hyper-V server has enough space and power to process the restored VM backup copies.
Find a Backup Solution to Support You with Hyper-V Best Practices
With our comprehensive guide, you’ve learned about best practices for creating an efficient Microsoft Hyper-V backup strategy. Now, it’s time to find a professional Hyper-V backup solution that will help you implement these practices and, most importantly, efficiently protect your virtual environment.
Xopero ONE addresses these needs, providing support for the latest Hyper-V technologies, multiple workloads (e.g. Windows-based endpoints, Windows Server, Microsoft 365, etc.) and storage locations (S3 clouds, SMB, NAS, local folder), secure end-to-end AES256 data encryption, ransomware protection through immutability, instant restore for maximum uptime, and much more.
You can start protecting your Hyper-V host and VMs from phishing, ransomware, and AI-backed modern threats right now. The investment in Xopero ONE pays off quickly, helping you avoid the costs of attacks (outages, ransom, etc.), recovery ‘chaos’, and awkward conversations with the board.
To start off, trial the tool for 14 days for free (no credit card required). Check out our reliable technologies, appreciate intuitive UI, and see if it’s a match.