

Agentless Backup of Virtual Machines: An Administrator’s Guide

Virtualization has made infrastructure deployment faster and easier than ever before. To keep pace, backup technology—the cornerstone of data security—must match the flexibility and scalability that virtualization provides.
Agentless backup is the answer to these needs. In this guide, we will explore host-level backup mechanisms to determine if the promises of reduced workload, improved performance, and enhanced security are a myth or a reality.
What is Agentless VM Backup?
Host-level backup allows for the efficient protection of all virtual machines (VMs) directly from the hypervisor. This approach eliminates the need to install individual backup agents or services on every single guest machine.
Agent-Based Backup vs. Agentless Approach
The following table highlights the key differences between these two approaches:
| Agent-Based Backup | Agentless Backup |
| – Requires installing a backup agent on each VM – Requires booting each VM to run backup process – Operates at the guest operating system level – Requires individual updates for every instance of a backup agent | – Installation of one agent to back up all VMs – No VM interaction required; VMs can even be powered off – Operates at the host level, covering each VM’s data and configuration – Only the host agent needs to be updated |
How Does Agentless Backup Work?
Think of agentless backup as “taking a photo” of the VM disk from the outside, rather than copying files from within. Whether you are using VMware, Hyper-V, or another hypervisor, the process generally follows these steps:
- The backup system (e.g., Xopero ONE) connects to the host/hypervisor.
- The hypervisor initiates the process of taking a snapshot that uses technologies ensuring data consistency (e.g. quiescing/VSS).
- A snapshot is created.
- The backup system backs up data, applying user’s settings, e.g. encryption, compression, deduplication, backup scheme (e.g. incremental copy).
- The backup system copies the backup to a selected backup destination (storage).
- A “cleanup” process takes place, where snapshots are deleted and changes that occurred during taking the snapshot are merged back.
👉 New to virtual machine backup? Read our comprehensive guide covering the fundamental concepts and strategies for VM data protection. Learn more
Technologies Driving Agentless Backup: Precision, Speed, and Efficiency
Agentless backups leverage native virtualization and guest OS technologies to ensure the entire process is accurate and high-performing.
Application Consistency (VSS and LVM)
Native mechanisms like Volume Shadow Copy Service (VSS) for Windows and Logical Volume Manager (LVM) with pre/post scripts for Linux enable application-aware (or application-consistent) backups.
These backups capture more than just the disk contents. They include data currently being processed in the RAM that has not yet been committed to the disk. It is critical for high-transaction environments where data changes rapidly.
To ensure error-free recovery (avoiding issues like incomplete database writes), application-aware mode should be used for:
- Databases such as Microsoft SQL Server, Oracle, MariaDB, and MySQL.
- CRM and ERP systems.
- Directory services (e.g., Active Directory).
- Mail servers (e.g., Exchange Server).
Since VSS and LVM are OS components, they are available for both agent-based backups and agentless copies (via tools like VMware Tools or Hyper-V Integration Services). Even though agentless backup architectures operate from outside VMs, it does not sacrifice backup data precision. What’s more, the convenience is significantly higher in agentless setups, especially in large-scale infrastructures.
LAN-Free Fast Data Transfer
LAN-free backup transport is available exclusively for Type 1 hypervisors—those installed directly on physical hardware (bare metal), such as VMware ESXi—rather than on top of an existing operating system (Type 2).
First, LAN-free allows for the rapid transfer of massive amounts of backup data. In the backup field, it usually means gigabytes of organizational data, including critical files.
Second, it offers reduced LAN congestion. It offloads backup traffic from the production network, ensuring that business applications remain responsive for users. By the way, modern backup tools have even more to offer in terms of data protection thanks to automated scheduling and backup windows.
There are two primary LAN-free methods:
- Direct SAN Access: The physical machine running the backup agent has direct access to the iSCSI or Fibre Channel SAN storage where the VM disks reside. It takes snapshots of the storage and transfers them via a dedicated SAN bus, resulting in maximum speed and zero load on the host or LAN. On the downside, there are high costs and the necessity to set up SAN infrastructure in advance, preferably during your virtual environment configuration.
- HotAdd: The disk of the target VM is “hot-plugged” into a backup virtual server (aka virtual backup appliance) and appears as a local volume. Data is copied via the internal system bus, providing high speed without the cost of expensive Fibre Channel hardware.
Efficient Incremental Backups (CBT/RCT)
Exclusive to agentless approaches are Changed Block Tracking (CBT) for VMware and Resilient Change Tracking (RCT) for Hyper-V. These technologies allow the host—and the backup solution—to easily detect block-level changes since the last backup job, so they know what should be included in an incremental backup.
The host tracks these changes with minimal resource overhead, saving them to files like -CTK.VMDK (VMware) or .RCT and .MRT (Hyper-V). Instead of scanning entire disks, backup software simply queries the host API for the changes.
Note that to use CBT or RCT, you need specific guest versions: Hardware Version 7 or newer (ESXi 6.7 or newer) for VMware and Configuration Version 8.0 or newer (Windows Server 2016 / Windows 10 Anniversary Update or newer) for Hyper-V.
Without the technologies in place, agentless backup would be inefficient. With CBT/RCT, backing up 100 VMs can be completed in minutes rather than overnight.
Pros and Cons of Agentless Backup
Since you’ve learned a bit about agentless backup solutions, let’s recap on the pros and cons of these.
The Advantages of Agentless Backup
- Simplified Management: No need to install an agent on each VM. While tools like Intune can help, running a single host-level wizard is far more efficient than maintaining complex guest policies across hundreds of machines and waiting for them to execute.
- Performance: The agent is an extra service in each guest machine OS. It consumes guest resources (CPU, RAM, and I/O) for file scanning and compression. With the above mentioned technologies and architecture in place, agentless backup operates externally, reducing CPU load, optimizing backup windows, and eliminating network traffic bottlenecks.
- Scalability: With the agent-based approach, adding 10 new VMs would require you to install 10 agents. When you use an agentless system, changes are discovered automatically and your backup simply works. To benefit from it, your backup plan needs to cover the whole host environment.
- Security: Agentless backup minimizes the attack surface. Every agent represents an open port and a high-privilege process (to access the entire file system). By backing up at the host level, you eliminate the need for using guest-level credentials and reduce the burden of patch management (by the way, outdated apps are a frequent vector for ransomware attacks). If you have to update just one agent—the one on the host—software maintenance is far from problematic.
The Drawbacks of Agentless Backup
- Legacy Systems: Agentless integration relies on modern integration tools like VMware Tools or Hyper-V Integration Services. “Museum-grade” or niche operating systems (e.g., Windows Server 2003, Solaris) may not support these, leading to less reliable and faithful, crash-consistent backups. The same applies to databases.
- Raw Device Mapping (RDM): Hypervisors often cannot use the snapshot technology for disks connected directly from a SAN (Raw/Pass-through), bypassing the virtual disk layer (VMDK/VHDX).
Configuring Agentless Data Protection with Xopero ONE
Xopero ONE is a modern backup software supporting agentless backup for VMware and Hyper-V environments. It includes native support for application-aware copies, LAN-free transport, and CBT/RCT.
You can test it for free for 14 days (no credit card required). During this period, you can check how Xopero ONE supports your virtual environment. To help you with testing, we’ve included some useful instructions below
Adding a Host with All VMs
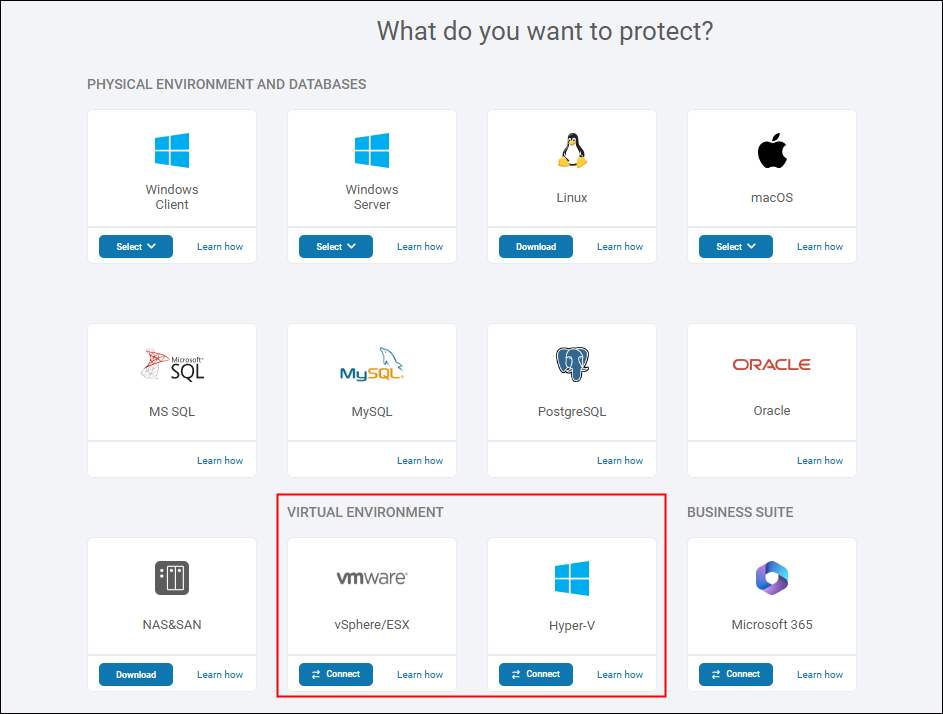
- Log in to the Xopero ONE management console and click Connect on a tile representing your chosen virtual environment (We’ll show steps for Microsoft Hyper-V below; for VMware, go here.).
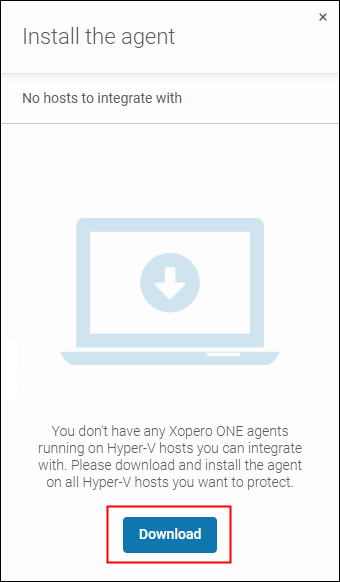
- In the pane that opens, click Download to get the installer. If you’re not working on the host, move the file and run the installer on your host.
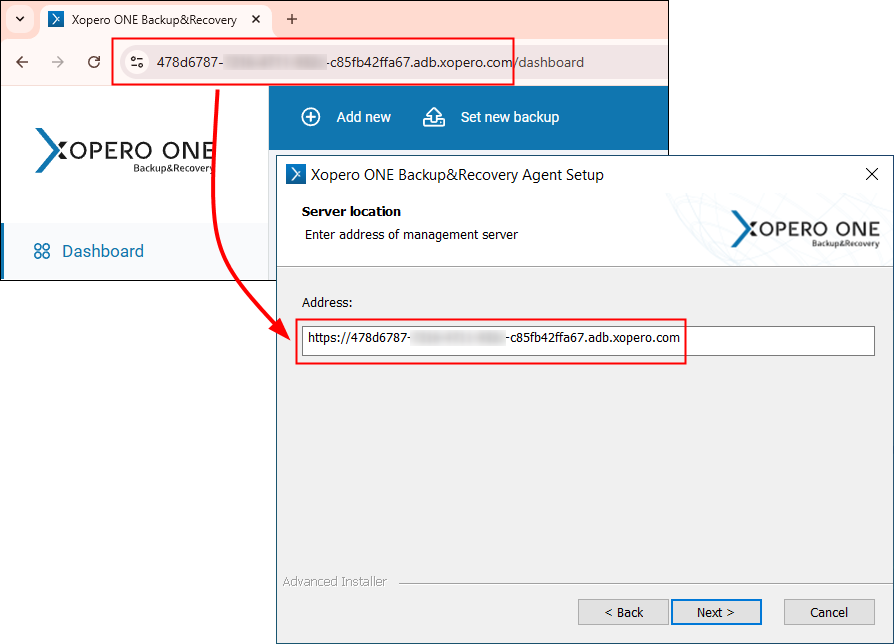
- Enter your unique management console address during installation by copying it from the address bar of your browser.
Note: If you’ve deployed Xopero ONE on-premises, the address format will be as follows:<IPaddress>:<port>.
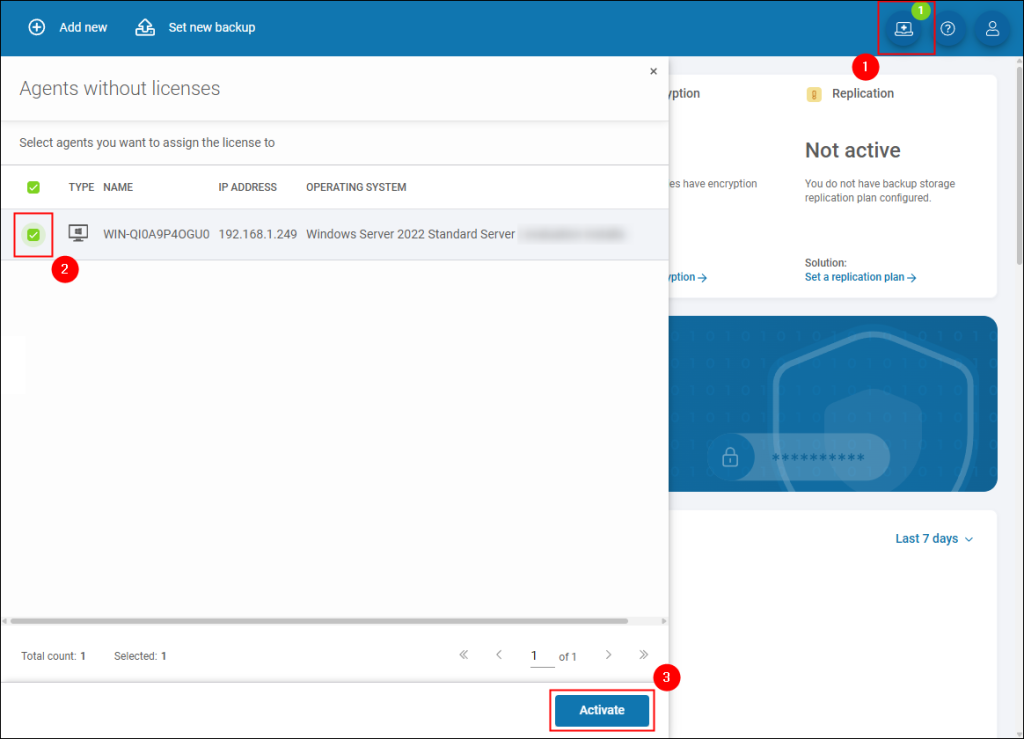
- Once you’ve completed the installation, you’ll see a notification in the top right corner of the screen, prompting you to activate the installed agent on the host. To do it, click the notification, select the agent on the list and click Activate.
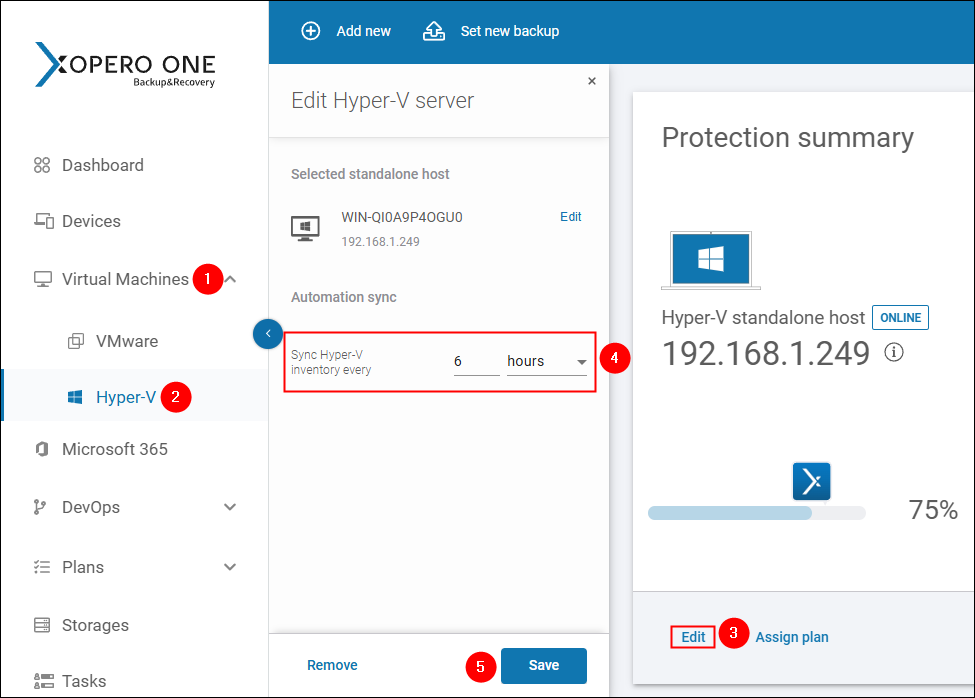
- Finally, you may set the Hyper-V host synchronization frequency. To do it, go to Virtual Machines > Hyper-V, click Edit on the host’s pane, set desirable sync frequency, and click Save.
Next, you can proceed to configure your first Hyper-V backup plan—the intuitive onboarding process will guide you through it.
Creating a Backup Plan for All VMs in a Host
After setting up your first backup via the onboarding process, you may want to configure a complete backup plan manually to fully tailor it to your specific needs. Here is a step-by-step guide on how to do that.
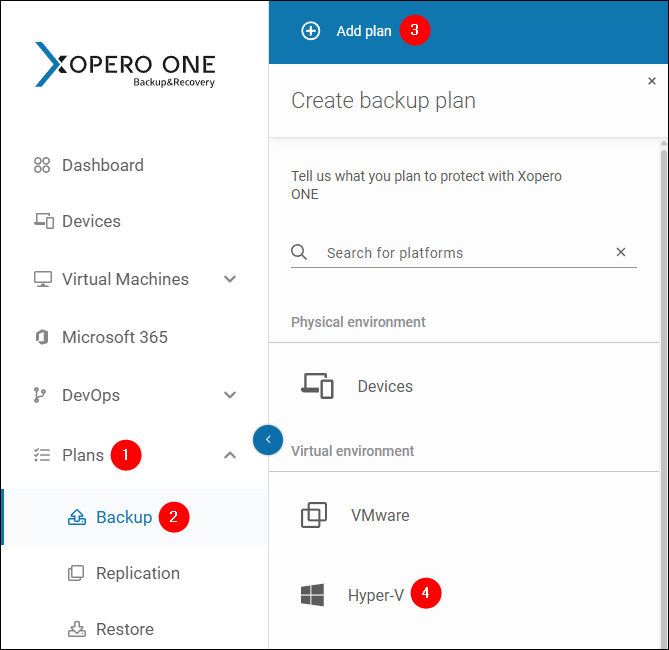
- Go to Plans > Backup, click Add Plan, and select Hyper-V from the list.
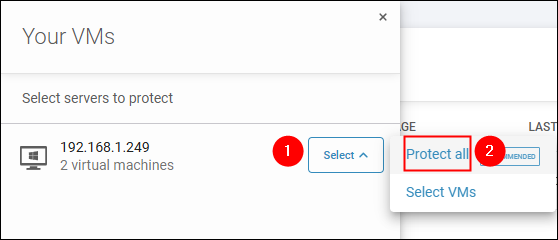
- Click Select next to the host address and choose Protect all.
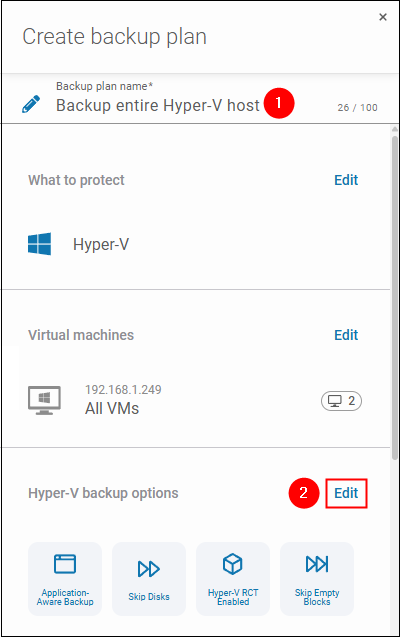
- Name your plan and go to Hyper-V backup options by clicking Edit.
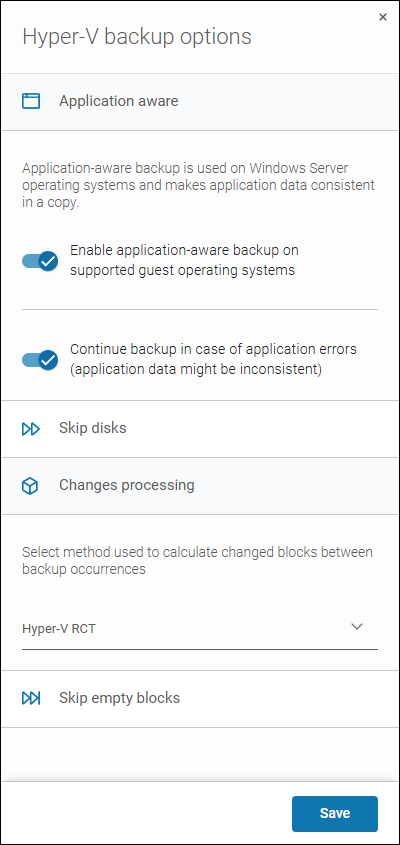
- Verify all options for Hyper-V backup. By default, all of them should be enabled. Click Save to save the changes.
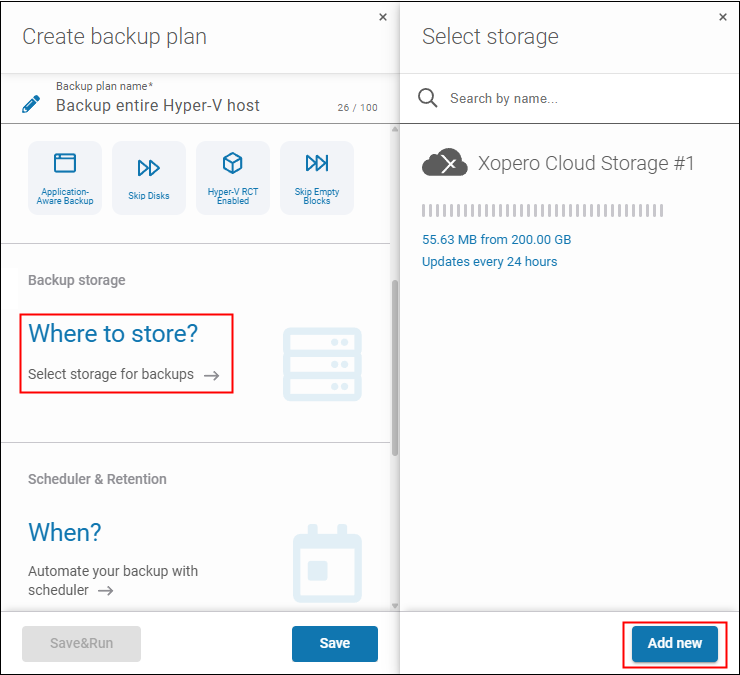
- Click Where to store? and select storage to keep backups of VMs. With Xopero ONE, you can also add a new one, choosing from a wide range of supported cloud storage and on-premises storage options.
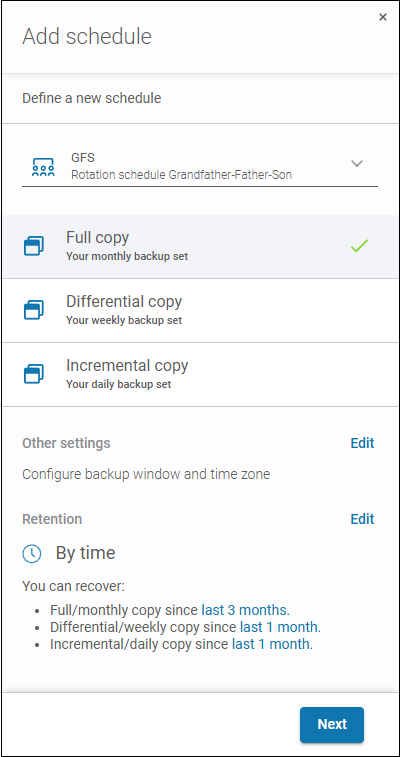
- Click When? to configure your scheduler (scheme, days, hours), backup window, and retention. To get details on each of these options, see our article on automated backups.
- Finally, click Edit to set up Advanced settings like backup compression, encryption, deduplication, and network bandwidth limit. These help you save resources and enhance backup security. Then click Save twice to save the advanced settings and your backup plan.
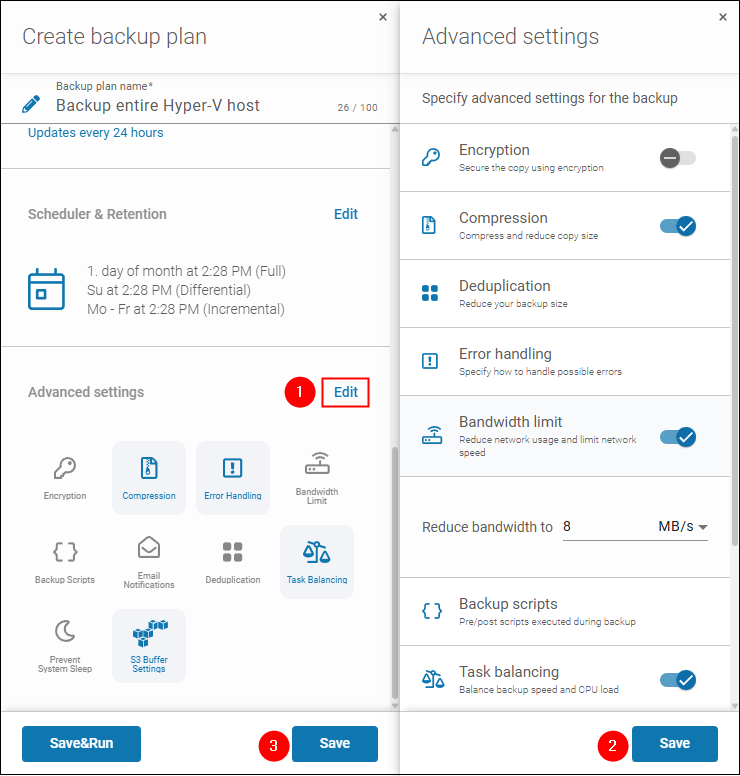
The plan will be added to your backup plan list and executed according to the schedule settings. Once created, your backup can be used for either full disaster recovery or granular restoration.
💡 Want to avoid common Hyper-V backup mistakes? Looking for expert tips on what to watch out for as an administrator? Read our article on Hyper-V backup best practices.
🎯 Considering migration from a VMware setup to Microsoft Hyper-V? Check out our guide on the best methods to convert your VMs.
Is Agentless Backup Right for You?
In the era of widespread virtualization, protecting VM data is the responsibility of system admins at nearly every organization. Agentless backup is the ideal choice if you have:
- Large Scale: You manage dozens or hundreds of VMs.
- High Dynamism: Environments where VMs are frequently added or removed.
- Infrastructure Constraints: Overloaded LANs that require fast, off-peak backup windows.
Before deployment, ask yourself these questions to avoid unpleasant surprises:
✅ Do my VMware/Hyper-V versions support CBT/RCT?
✅ Are VMware Tools or Integration Services up to date on my guests?
✅ Does my infrastructure support LAN-free transport?
✅ Does my backup system support application-aware processing for my specific databases?
For legacy systems, you need to remember about potential compatibility issues that result from limited support for virtualization integration tools. To fix it, you can utilize a hybrid configuration of agentless and agent-based approaches, managing everything from a single administration point (backup management console). You can use Xopero ONE for it.
In conclusion, agentless VM backup is a definitive best practice in today’s complex and fast-paced virtual environments. By adopting this approach, administrators not only save significant time and resources; they also gain the peace of mind that every virtual machine can be restored accurately and without errors. After all, that is exactly what backup is all about.